Skip to content
FULMO Blog
  • FULMO
  • Community
  • Shop

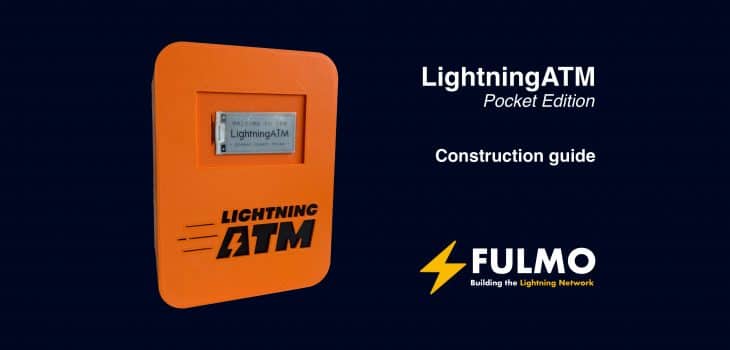
Bitcoin LightningATM – Pocket Edition construction guide

  • August 5, 2022August 5, 2022
  • by Tim

The LightningATM is a fully functional Bitcoin ATM and demonstrates the power of the Bitcoin Lightning Network. It accepts Fiat-Coins and gives you back precious Satoshis (SATS). Thanks to Lightning even small amounts can be exchanged with near-zerofees. The LightningATM is the perfect Showcase on every Meetup, Conference, or in your Office to onboard more people in a fun way to Bitcoin.

In this guide, we put together our knowledge and give you a guide to assemble the LightningATM construction set which you maybe bought in our shop. But even if you purchasedall the parts by yourself the guide should be helpful. Besides our documentation,you find excellent tutorials and videos on the official Bitcoin LightningATM wiki and in our first guide. If you prefer to have a tutorial in german I can highly recommend the great tutorial at Ereignishorizont.

This guide is divided into five sections:

  • overview LightningATM hardware components
  • hardware assembly guide
  • Software setup LightningATM
  • Software setup lntxbot
  • your first exchange


Important: All the hardware assembly and software setup/usage you are doing at your own risk!

LightningATM hardware components


Before you can put together the different hardware components you should haveat least the following tools for the proper construction of the ATM at hand:

  • small screwdriver
  • voltmeter
  • one insulated plier (alternative: sharp knife)
  • soldering iron (optional)

If you don’t have a voltmeter at hand maybe ask in a hacking space near you before you purchase one, they should have one. You need the voltmeter just to tune thevoltage transformer once.
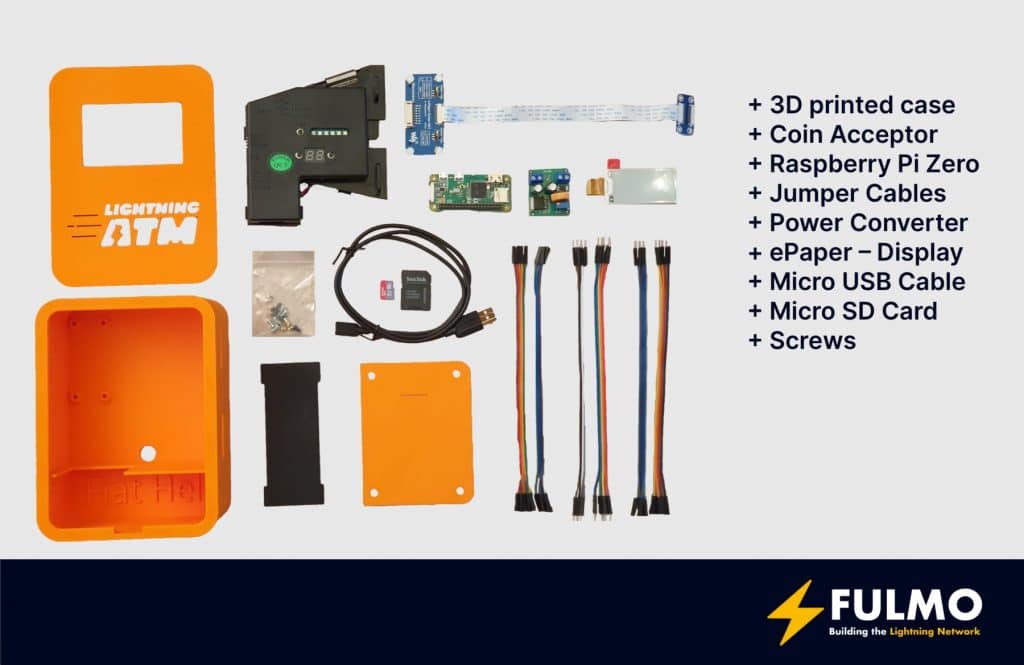
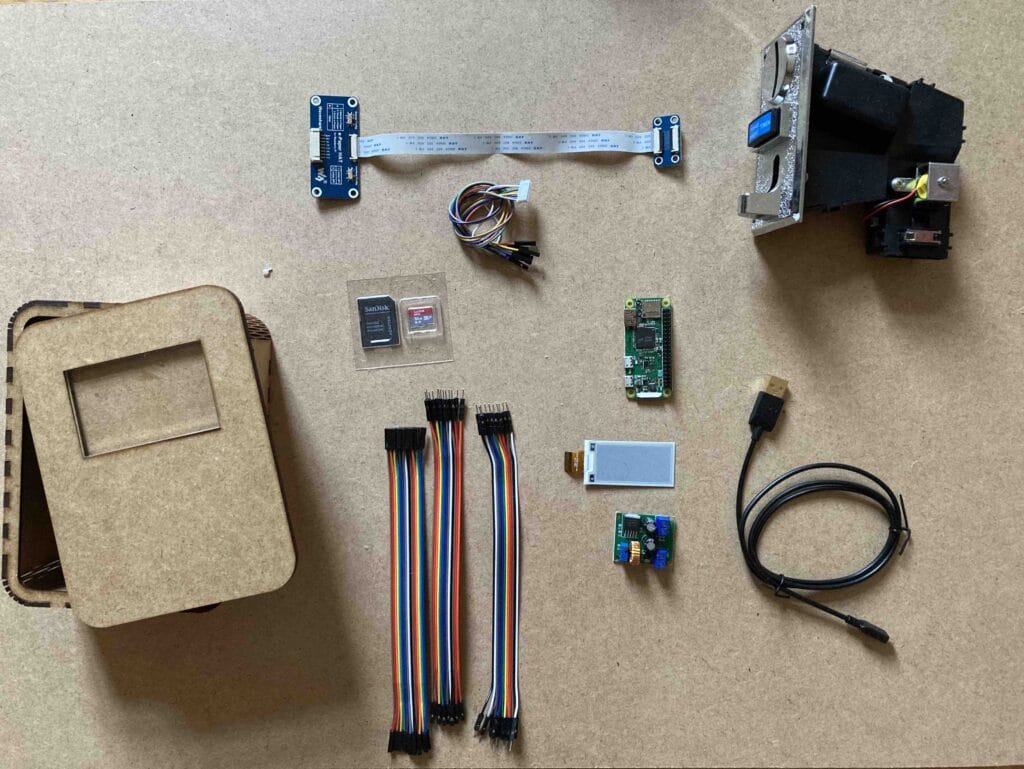
ATM components.

All the parts you need for the ATM are the following:

  • 3D printed case
  • Coin Acceptor
  • Raspberry Pi Zero
  • Jumper Cables
  • Power Converter
  • ePaper – Display
  • Micro USB Cable
  • Micro SD Card
  • Screws

We recommend using the Version 2 of the Waveshare 2.13inch display. Otherwise, you can face problems in running the demos from Waveshare library and the ATM software itself. Please check the back of the display for a “V2” sticker.

When you have all parts together let’s get our hands dirty and let’s assemble the components.

Hardware assembly

Micro USB Cable

Let’s start with the preparation of the Micro USB Cable. With some luck, you got already the Micro USB / USB Type-A version with open wires. Lucky peep, no work for you. If you got one complete Micro USB / USB Type-A cable you have to cut it in half. The cable with the Micro USB head should be around 12 cm.
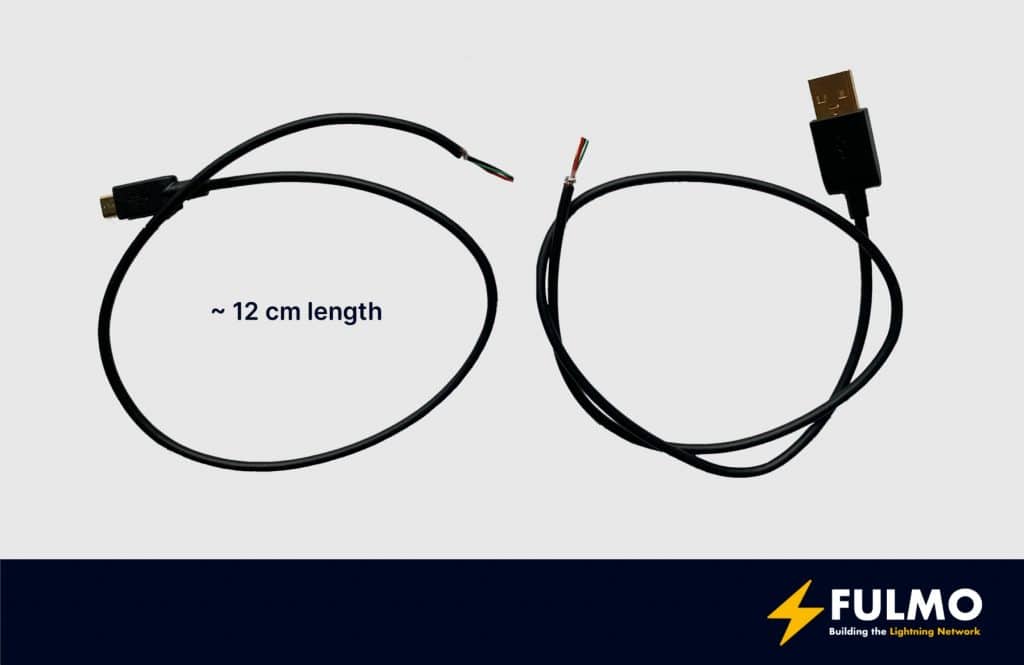
Micro USB Cable

You have to uncover the electrical conductors and can also remove the data conductors (green and white) from the cable if you want. For the best possible result and to have it easier for the connection with the power converter, you should solder the conductors. But no worries if you haven’t a soldering iron you can just twist the conductors and bring them in shape.

Prepare the power converter

If you have your UBS-Cable prepared you can now connect it to the IN ports of the power converter. The black cable has to be connectedto IN(-) and the red cable to IN(+). If the cable is connected to the converter you have to adjust the resistor to get the proper poweron the outgoing connections of the converter.
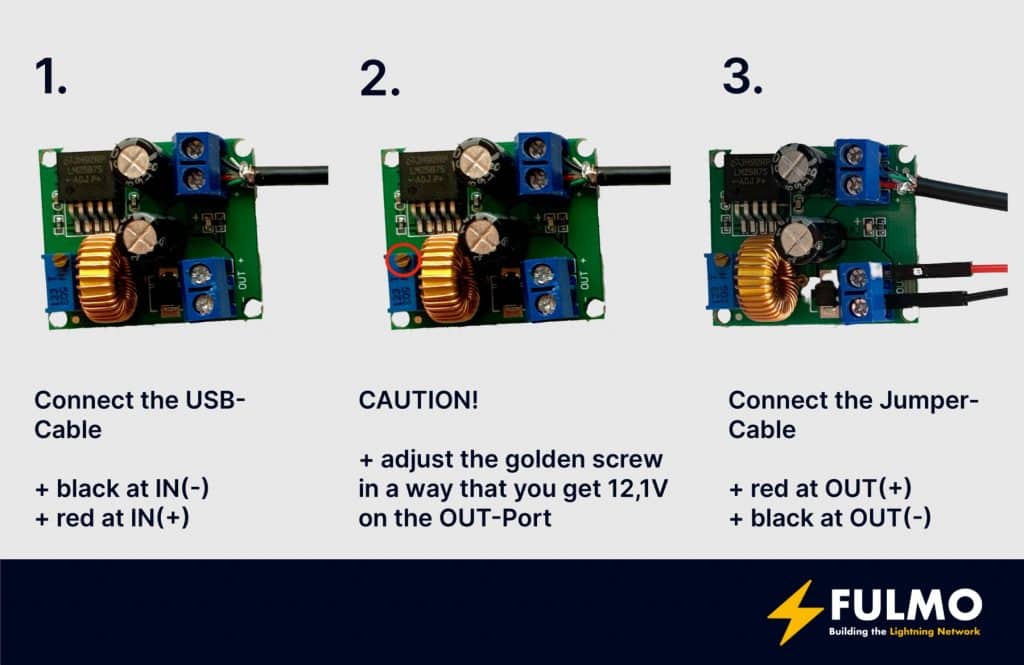
CAUTION! IN THE NEXT STEP!

The converter could have high voltage on the OUT ports.

Connect the USB-Cable head to a power bank or 5V battery and put the voltmeter at the OUT(-) and OUT(+). Now adjust the little golden screw as long as you have 12,1V on the voltmeter. You must have exactly 12,1V. If the voltage is too high, you could destroy the coin acceptor. Remove the voltmeter from the OUT port and add two jumper cables to it.

Prepare the coin acceptor

Now you can connect the jumper cables with the coin acceptor. The red jumper cable goes to DC12V and the black jumper cable goes to GND.
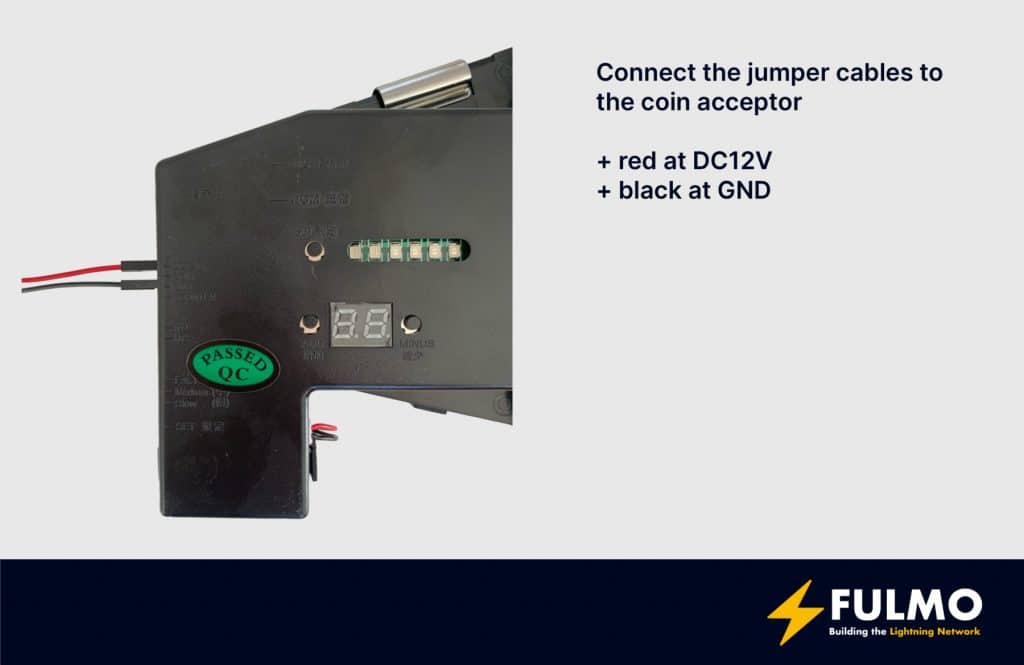
Configure and teach the coin acceptor

When you finished the previous steps your setup should now look something like this, except for the power supply:
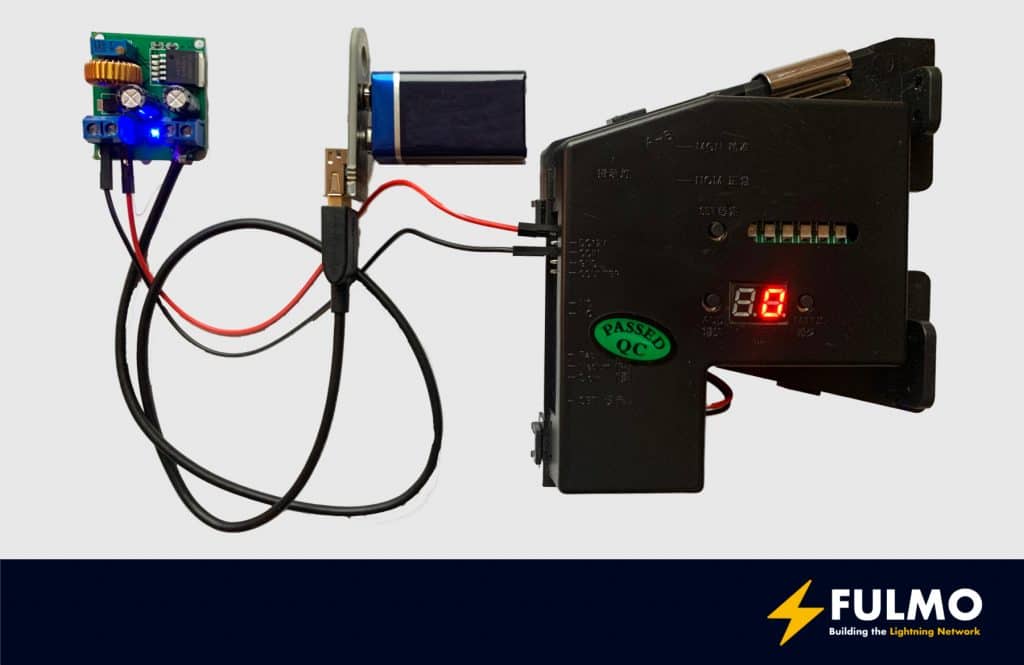
Now it’s time to configure the coin acceptor.

If you prefer a more visual guide for the configuration and for the teaching of the coin acceptor you should check out the following video from 21isenough: https://youtu.be/14JfEhNSdZE?t=1413

Following the steps for the configuration.

  • Set the two step switch on the coin acceptor to “NO”
  • Set the three step switch to “Medium”
  • Press and hold the ADD and MINUS button at the same time until A appears in the display
  • Press the SET key and hold it for a short time, then E appears in the display. This indicates that you are now in the menu for the number of different coin types
  • Use ADD (or MINUS) to set the number of coins to 6 (coins = 5 cents to 2 euros) and press SET
  • Now the display shows H1 (for first coin) and the first of 6 LEDs should be active
  • Now indicate how often the coin should be inserted for calibration. Set to 20 with ADD (or MINUS) and press SET
  • The display now shows P1 for further settings of coin 1 and you can define the output signal 5 cents = 2 pulses / 10 cents = 3 pulses / 20 cents = 4 pulses / 50 cents = 5 pulses / 10 euros = 6 pulses / 2 euros = 7 pulses
  • Set with ADD (or MINUS) to 2 pulses (for 5 cents) and then press SET
  • The last thing on the display is F1, which stands for the accuracy of the coin detection. The value 8 worked well
  • Use ADD (or MINUS) to set to 8 and then press SET
  • The parameterization for the first coin is now done and the next 5 coins must follow
  • Now the second LED is on and the display shows H2
  • Repeat the same steps for the second coin up to 6 coins
  • If all coins are set, all LEDs flash briefly to confirm and the display shows A again
  • After a short time the display shows 0 (zero) again

If the steps were successful you can calibrate now the coin acceptor.

  • Press the SET key twice
  • The first LED light and A1 appears in the display
  • Now insert the first coin (5 cents) 20 times.
  • It is recommended to use as many different coins of the same type as possible
  • After all that the LEDs will flash and the display will show A2
  • Repeat the procedure for the remaining coins
  • All LEDs flash again briefly for confirmation and the display shows 0 again

Now the coin acceptor is ready.

Prepare the display

The next step is the preparation of the display. If you have any issues with the display or later problems with the software for the display you should check out the official Waveshare Issue-Tracker and the official documentation.
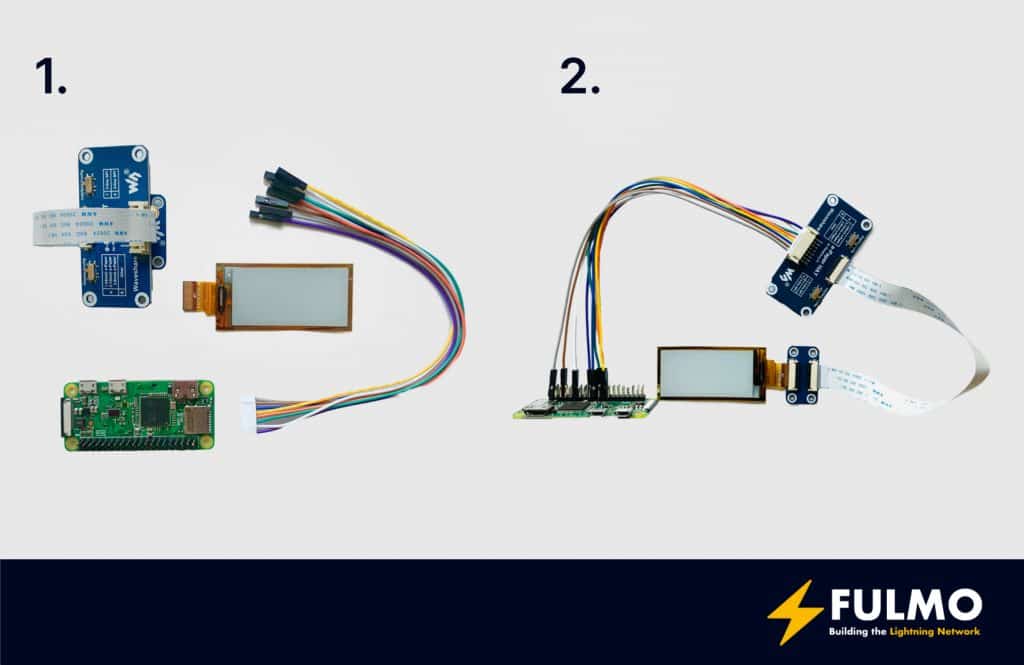
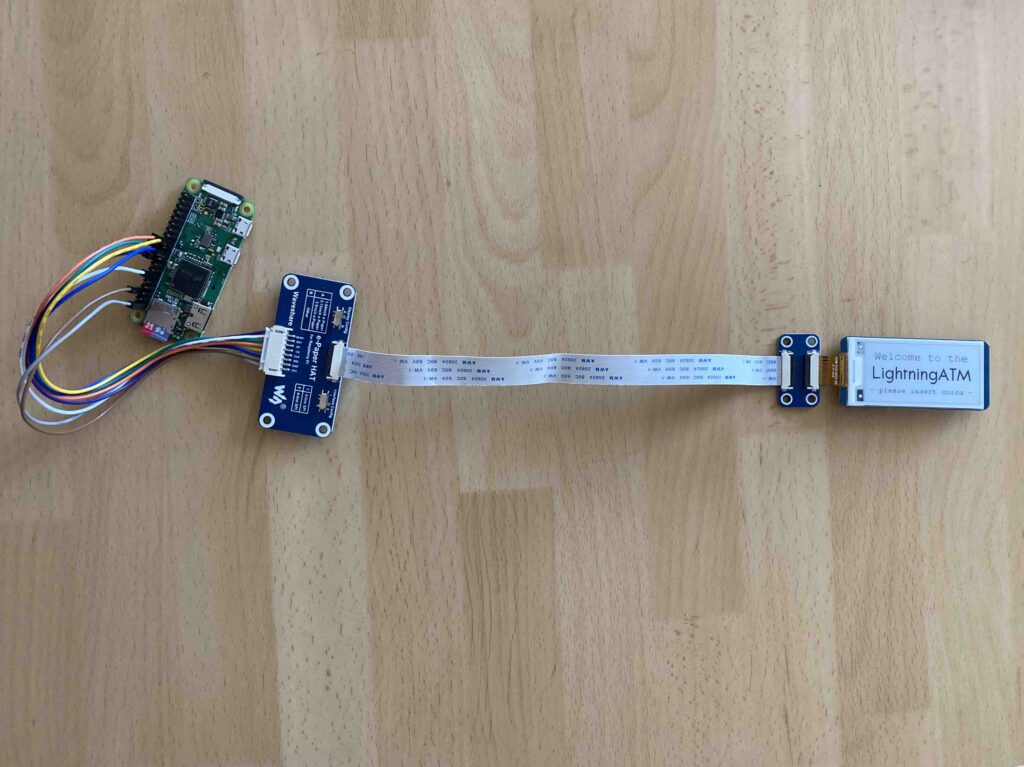
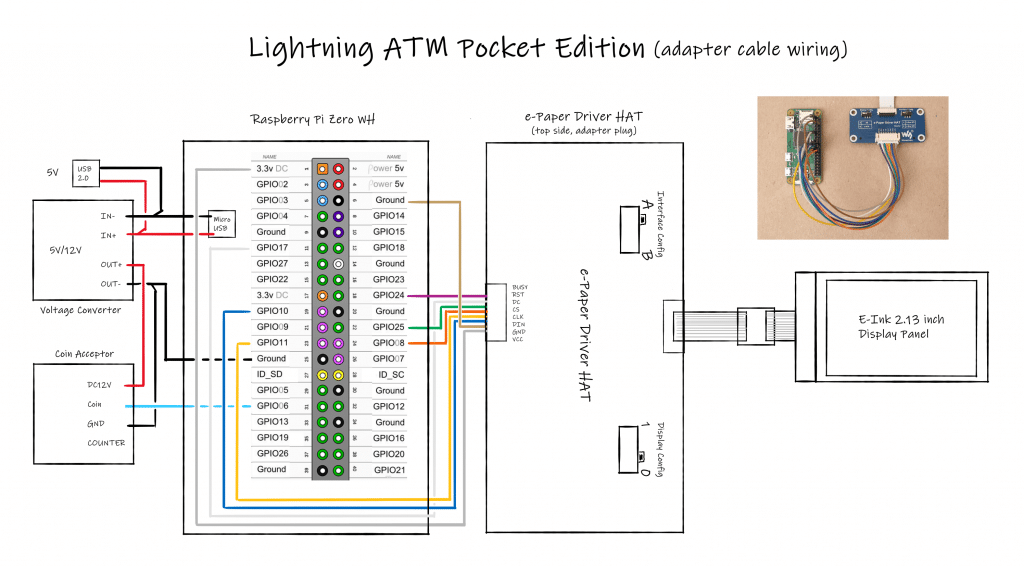
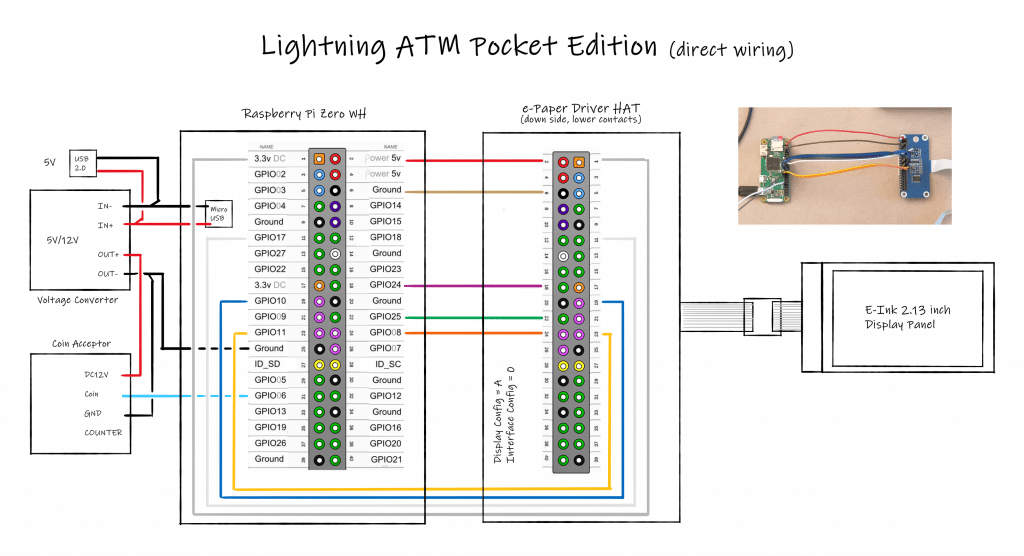
First, you mount the e-Paper display to the e-Paper-Adapter. Be careful, the e-Paper display is very fragile. The next step is to connect the e-Paper-Adapter to the e-Paper-HAT with the flat white cable. The third step is to connect the 8 cables from the e-Paper-HAT to the Raspberry Pi Zero. For the wiring, details have a look at the great plan from Axel Hamburch:
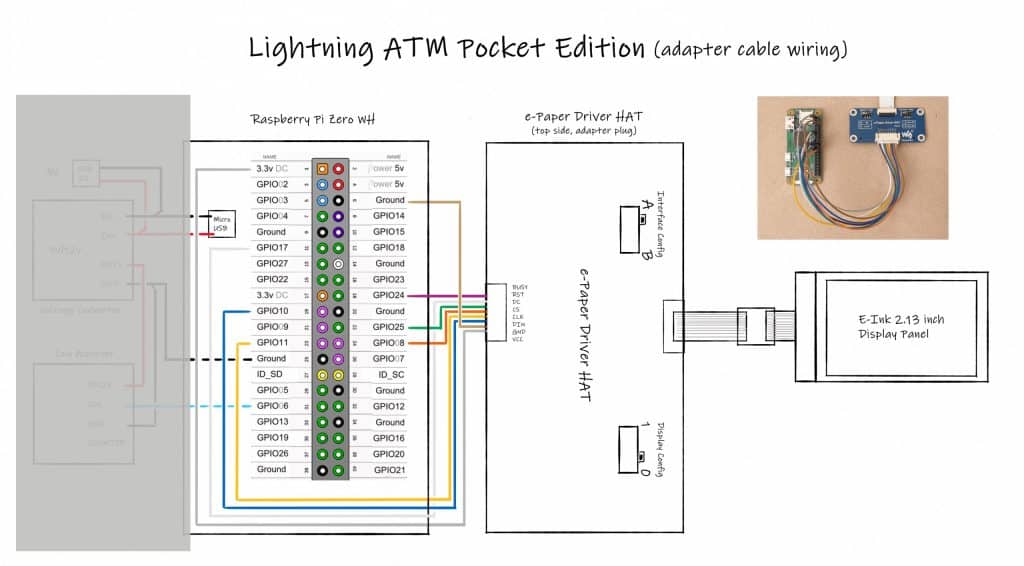
Connect the Raspberry Pi Zero with the Coin Accepetor
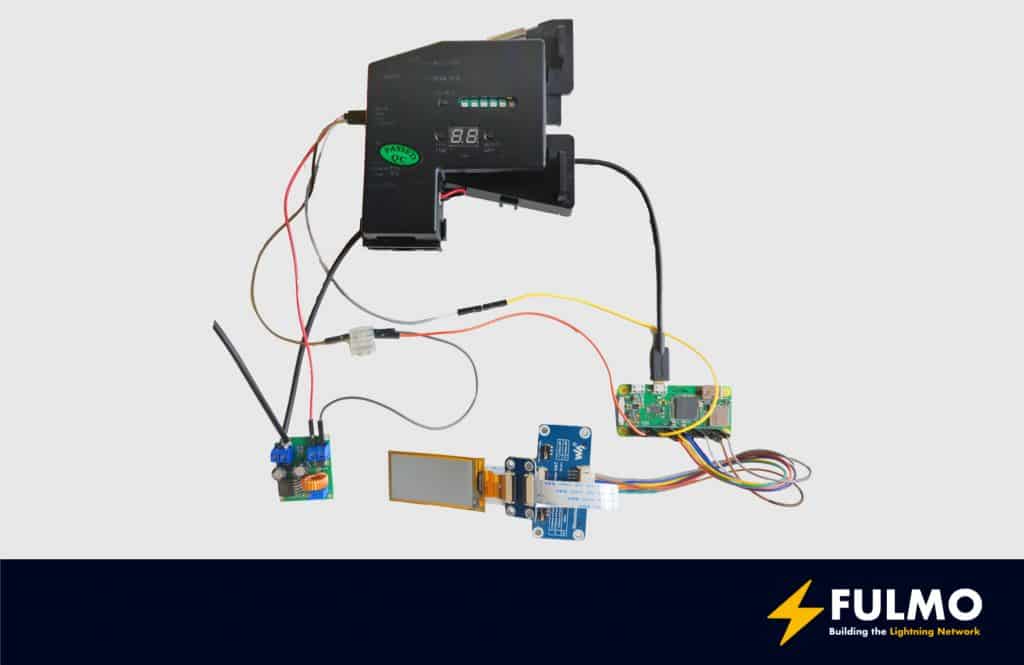
For further details look at the detailed wiring plan:
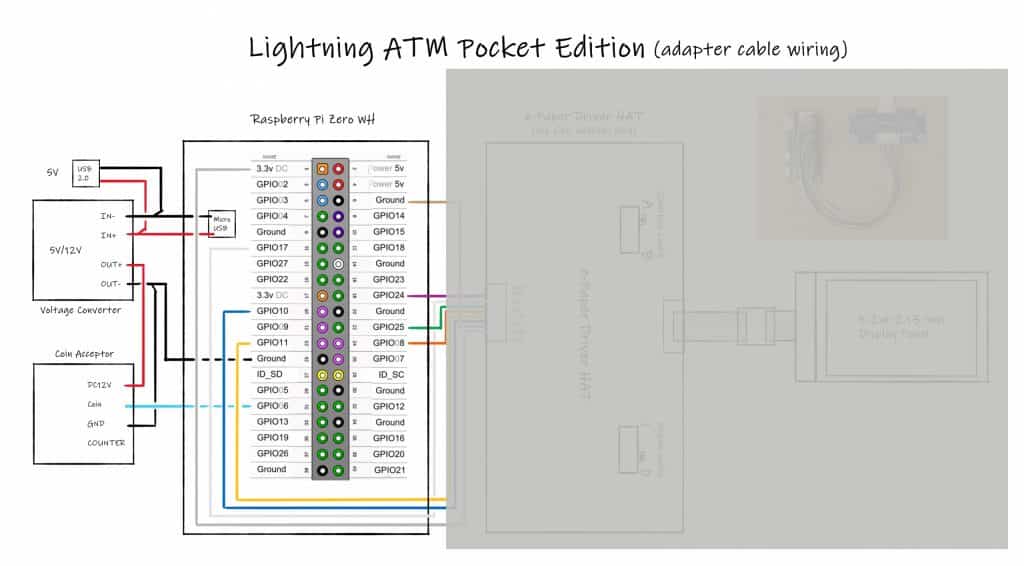
At that point your hardware is ready and you can go to the software setup. Before you put everything into the case I recommend first to setup the software. It’s easier to do debugging outside of the case.

Setup the LightningATM

Install the ATM software

You can find further explanations at the official ATM documentation.

  • Download the Raspbian ATM Image
  • Flash the Image to the SD Card with balenaEtcher
  • Remove and add the SD Card again to your computer
  • In the mounted SD Card add one file to the /boot folder on the flashed SD Card
  • Create “wpa_supplicant.conf” file and add your Wifi credentials

The configuration file should look like:

ctrl_interface=DIR=/var/run/wpa_supplicant GROUP=netdev
update_config=1

network={
	ssid="Home"
	scan_ssid=1
	psk="XXXXXXXXXXXX"
	id_str="Home"
}

Remove the SD Card from your computer and put the card in the Pi Zero.Turn on the Raspberry Pi now and wait a bit. In the meantime check atyour local router which IP address was assigned to the Zero. To makethings easy in the future let the router always assign the same IPaddress to the Pi.
Go to a terminal application on your computer and remotely access yourPi. For example the “Terminal” on macOS or Windows via the SSH-Client”PuTTY”.

  • Login to your Zero with the IP and the user “pi” for example “pi@192.168.xxx.xxx”
  • Confirm to add the ECDSA key fingerprint with “yes”
  • Login with the default password “raspberry”
  • Change the default password of the user “pi” to a new password with “passwd”. CAUTION: you have to remember the password for the future. Best, put it directly into a Password-Manager
  • Upgrade the Pi Zero to the newest software version
$ sudo apt update && sudo apt upgrade

It takes some time but doesn’t skip the step because you will also get security patches with an update.


Now you can install “clone” the current version of the LightningATM Software:

$ git clone https://github.com/21isenough/LightningATM.git
$ cd LightningATM
$ pip3 install -r requirements.txt

In the process, the Pi will reboot and you have to log in again with the credentials you set earlier.

Install the display drivers

First you have to install the Waveshare Python display driver.
Execute the following commands:

$ cd ~
$ git clone https://github.com/waveshare/e-Paper
$ cd ~/e-Paper/RaspberryPi*/python
$ sudo python3 setup.py install

If you want to test for the correct installation and correct wiring of your display you can use the example programs included in the cloned project.

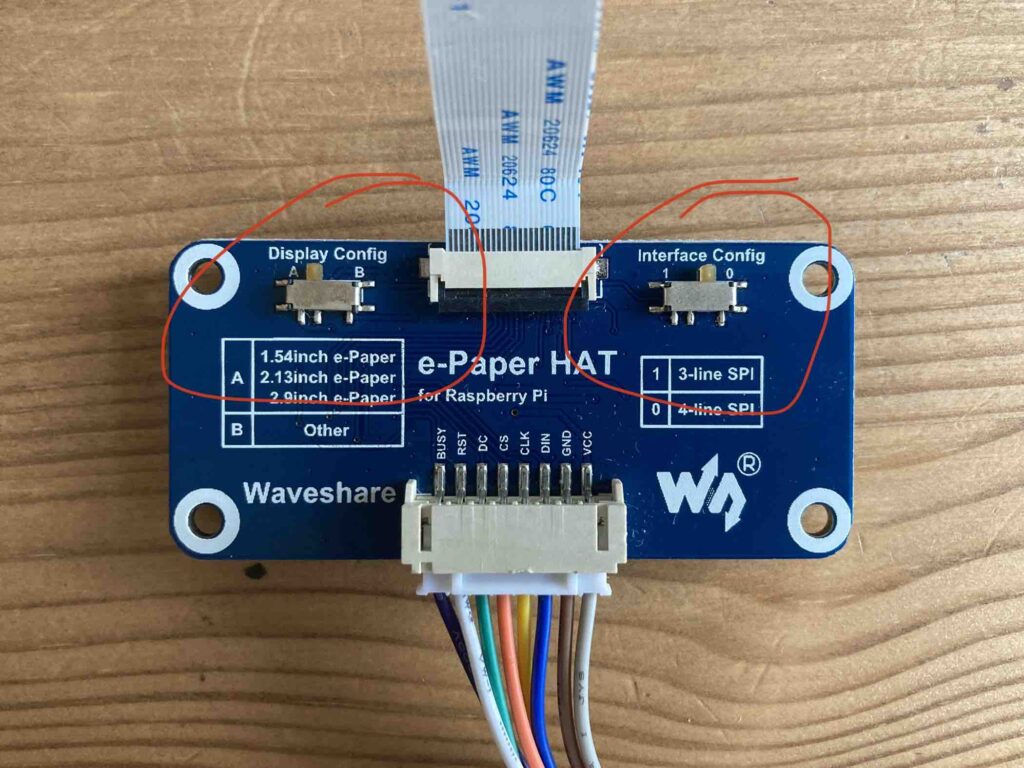
CAUTION: Before running the display test make sure that your e-Paper-HAT switches (little jumpers) are set to A and 0.

$ cd ~
$ cd e-Paper/RaspberryPi_JetsonNano/python/examples/
$ sudo python3 ./epd_2in13_V2_test.py

CAUTION: If you have a different display version (little sticker on the e-Paper display back) than “V2”, you have to adjust the test program accordingly.

If you have problems getting the demo running you find more help in the Waveshare Issue tracker.

If everything works fine you can initialize the ATM software. With the first startup of the ATM, the “config.ini” will be created.

Execute the following commands:

$ cd ~/LightningATM/
$ ./app.py

This will lead to an error like “No display configuration matched”. That’s why we have to adjust the “config.ini” now.

$ cd ~
$ nano ~/.lightningATM/config.ini

When the file is open, change the “display” variable to “waveshare2in13v2”.

# Define what screen you are using with the ATM
# Current options are:
# display = papiruszero2in
# display = waveshare2in13
display = waveshare2in13v2

You can save your changes now and close the file for now.

Setup lntxbot

To get Bitcoin for the dirty fiat coins to have to define an exchange endpoint. To keep things easier we concentrated on the Telegram-Bot called lntxbot. You could do the same with a BTCPay Server endpoint.


Open the “config.ini” file and do the following adjustments.
Set the wallet to the lntxbot.

activewallet = lntxbot

Now you can add your credentials for the bot:

[lntxbot]
url = https://lntxbot.com
creds = YOUR_LNTXBOT_CREDENTIALS

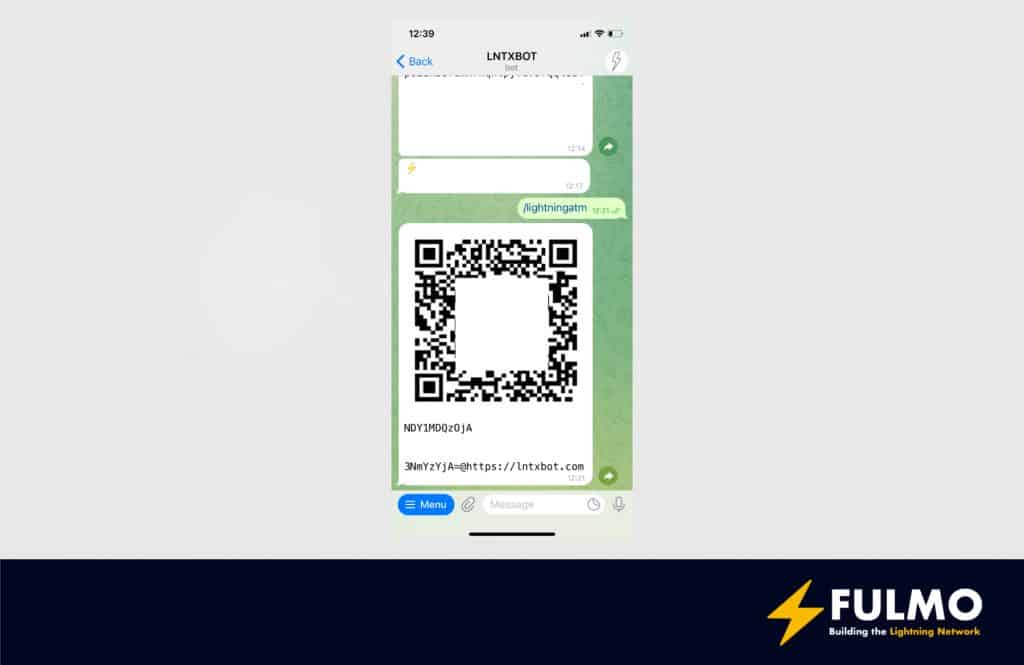
In your lntxbot you can get your credentials with the following command:

/lightningatm

The output should be similar to:

You can save the file now.

First exchange

If the previous steps all succeeded you can test your first exchange with the ATM.

$ cd ~/LightningATM/
$ ./app.py

You should see now the welcome message from the ATM and can insert the first coins.After some time the display should print that beautiful invoice which you canscan in your wallet.
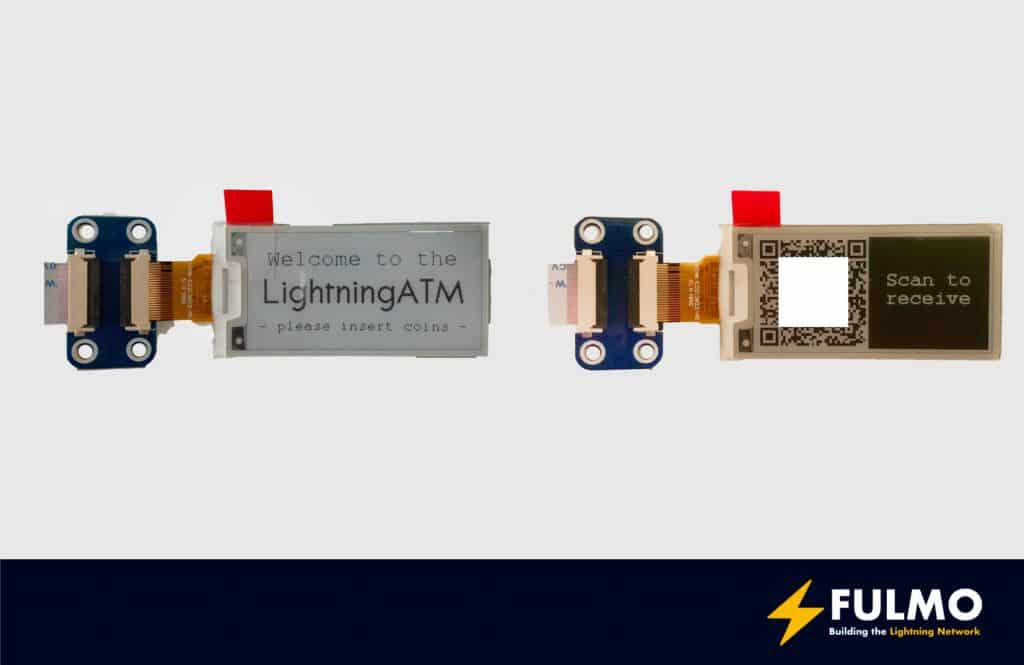
Congratulations! You made your first transaction with the Pocket ATM. Now spread the word and showcase the ATM on the next community meetup.

May the Bitcoin be with you!
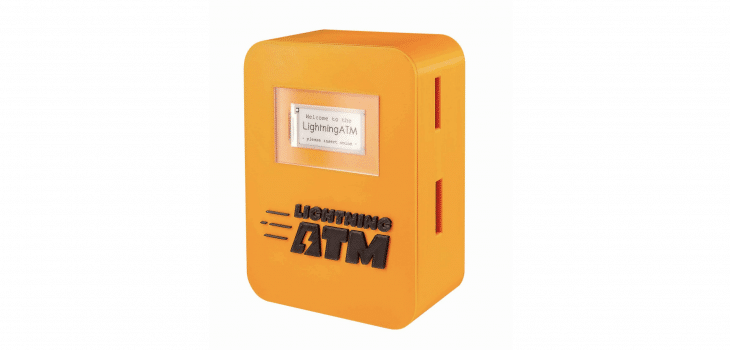
The Lightning ATM Pocket Edition

The LightningATM – Pocket Edition

  • September 18, 2020January 18, 2022
  • by LightRider

The LightningATM is a fully functional Bitcoin ATM. It was invented, designed and improved by @21isenoug.

The product itself and its documentation is outstanding. We invite you to go down another rabbit hole in the Bitcoin universe.

The LightningATM – Documentation
The LightningATM – Github

In July, a new project was born – the Pocket Edition, as 21isenough announced on Twitter:

I made a thing 🤓 #LightningATM – Pocket Edition

Fits in (almost) ever pocket ⚡ Bring it everywhere and introduce people to #Bitcoin / #LightningNetwork

✅ 100% Open Source
✅ Beginner friendly
✅ No camera, no button
✅ LNURL only
✅ Lightweight, small
✅ Affordable pic.twitter.com/ks9uFPOIn9

— 21isenough (@21isenough) July 24, 2020

This was not only the first Bitcoin LightningATM, as it also became the first ToGo Bitcoin ATM. The Pocket Edition is way smaller and the hardware requirements have decreased as well.

You don’t need the camera or the button for the Pocket Edition. So, you not only save space, but you also save some money to stack more sats.

Who wouldn’t love you for bringing The BitcoinATM on a date?

But there are more hardware changes

Due to less space inside the case you also need another display for this version of The LightningATM.

All parts needed for the Pocket Edition, visit shop.fulmo.org

It is recommended to use the Waveshare 2.13in display. You‘ll also need an adapter for a band cable. Otherwise, you will have trouble placing the display correctly in the case.

Raspberry Zero, Waveshare adapter and display

To be honest, I am not the “deep tech guy” and had some trouble setting this up, so I decided to write this guide to help others out there. If anything is not clear or if you find any mistakes, please reach out to me. This guide will be updated accordingly.

1. Correct wiring (detailed plan see 1.1)

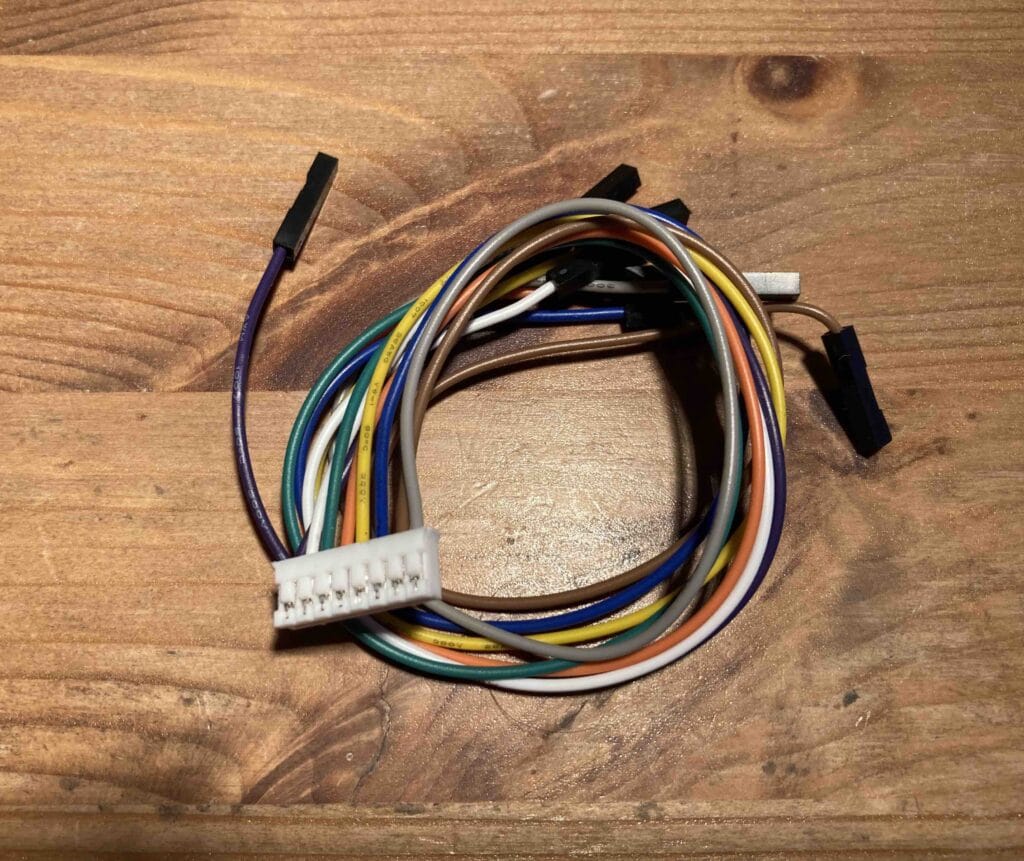
You need to connect the screen adapter with the Raspberry Zero. For that you take the included jumper connector with 8 jumper cables.

There are 8 colors:

  • Purple
  • White
  • Green
  • Orange
  • Yellow
  • Blue
  • Brown
  • Grey
The jumper connects to the Pi Zero

I followed this wiring plan when setting up the display (old version/new one below):

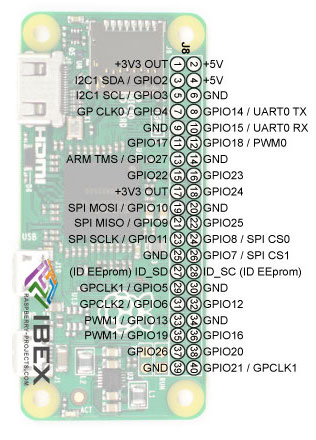
Jumper cable colorPin on the Pi Zero board
Grey3.3V (1)
BrownGND (6,9,14,…)
Blue19
Yellow23
Orange24
Green22
White11
Purple18
Wiring plan

Raspberry Zero pinout

1.1 Detailed plan for different versions

Once you have checked twice that you have connected the cables with the right pins you can proceed to the software setup.

2. Software setup

Make sure you have followed all the steps in the official documentation to the end before you proceed.

Keep in mind that the Pocket Edition is an extension of the original Lightning ATM. So, we’ll only need a few additional steps.

First you have to install the waveshare Python library.

Execute the following commands:

$ cd ~
$ git clone https://github.com/waveshare/e-Paper
$ cd ~/e-Paper/RaspberryPi*/python/
$ sudo python3 setup.py install

If you want to test for the correct installation and correct wiring of your display you can use the example programs included in the library.

Before running the test make sure that your screen adapter switches are set to A and 0.

To run the example file:

$ cd ~
$ cd e-Paper/RaspberryPi_JetsonNano/python/examples/
$ sudo python3 ./epd_2in13_V2_test.py

If everything is set up correctly you should see something like this:

e-Paper Demo Screen

Everything looks fine? Great!

Now you have to go to your config.ini file:

$ cd ~
$ nano ~/.lightningATM/config.ini

When the file is opened, change display variable to waveshare2in13

See below:

# Define what screen you are using with the ATM
# Current options are:
# display = papiruszero2in
# display = waveshare2in13
display = waveshare2in13

Confirm with Crtl + x and y to save the changes.

That’s it!

Now start your Lightning ATM again.

$ cd ~/LightningATM/
$ ./app.py

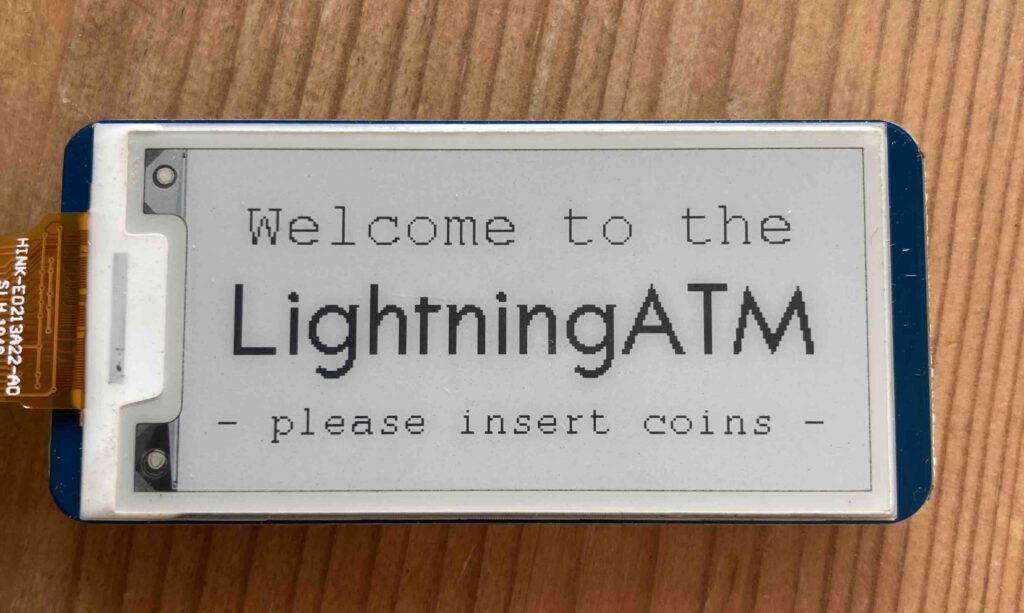
You should now see this on the screen:

The LightningATM Welcome screen

And we’re done! I hope this was explained easy and logical enough.

Additional tips

  • Since the Pocket Edition doesn’t have a button I would also change the payoutdelay variable in the config.ini to something more than 0.
  • If you want to change the coin correspondence to the pulses generated by the coin acceptor you can change this in the app.py file.
    if config.PULSES == 2:
        config.FIAT += 0.02
        config.COINCOUNT += 1
        config.SATS = utils.get_sats()
        config.SATSFEE = utils.get_sats_with_fee()
        config.SATS -= config.SATSFEE
        logger.info("2 cents added")
        display.update_amount_screen()
    if config.PULSES == 3:
        config.FIAT += 0.05
        config.COINCOUNT += 1
        config.SATS = utils.get_sats()
        config.SATSFEE = utils.get_sats_with_fee()
        config.SATS -= config.SATSFEE
        logger.info("5 cents added")
        display.update_amount_screen()
    if config.PULSES == 4:
        config.FIAT += 0.1
        config.COINCOUNT += 1
        config.SATS = utils.get_sats()
        config.SATSFEE = utils.get_sats_with_fee()
        config.SATS -= config.SATSFEE
        logger.info("10 cents added")
        display.update_amount_screen()
    if config.PULSES == 5:
        config.FIAT += 0.2
        config.COINCOUNT += 1
        config.SATS = utils.get_sats()
        config.SATSFEE = utils.get_sats_with_fee()
        config.SATS -= config.SATSFEE
        logger.info("20 cents added")
        display.update_amount_screen()
    if config.PULSES == 6:
        config.FIAT += 0.5
        config.COINCOUNT += 1
        config.SATS = utils.get_sats()
        config.SATSFEE = utils.get_sats_with_fee()
        config.SATS -= config.SATSFEE
        logger.info("50 cents added")
        display.update_amount_screen()
    if config.PULSES == 7:
        config.FIAT += 1
        config.COINCOUNT += 1
        config.SATS = utils.get_sats()
        config.SATS = utils.get_sats()
        config.SATSFEE = utils.get_sats_with_fee()
        logger.info("100 cents added")
        display.update_amount_screen()
    config.PULSES = 0

I hope this guide was helpful. Please let me know if you find any mistakes or if you have any advice for improvements.

If you are searching for a case, or a construction set for the Pocket Edition you can buy one in the FULMOShop.

And, of course, you can pay with Lightning!

RaspiBlitz Unboxing

  • May 22, 2020May 22, 2020
  • by Philipp Giese

Becoming a first class citizen of Bitcoin – My experience with the Raspiblitz

“Be your own bank” – a saying strongly associated with Bitcoin, similarly close, perhaps even more than the Cypherpunk saying “Don’t trust, verify!”. And that is true: Bitcoin promises a monetary system which is not built upon different layers of trust. So you don’t need to trust VISA, your bank, an exchange, the FED or the ECB.

That‘s the ideal, but how does reality usually look like? Even when people are not storing their bitcoins on Coinbase or Binance, a lot of enthusiasts think that the journey to trustlessness ends with a hardware wallet. As reliable as hardware wallets oftentimes tend to be, it is a new layer of trust – and unfortunatelly, hardware wallets are unreliable sometimes.

So, is a paper wallet the solution? Well, a paper wallet is much simpler than a hardware wallet and hence not as error-prone (but much more cumbersome to use, but that’s another story).

With a seed phrase on a sheet of paper… are we trustless now? Of course not, we still have to trust other parties to host the Blockchain!

I hosted a Bitcoin client a long time ago, however, I took it down and never started a new one. A dirty little secret, right? From someone who is quite active in the Bitcoin community it should be expected that he is a first class citizen of Bitcoin. As a data nerd, getting in possession of the whole Blockchain was always quite a temptation for me. Needless to say, setting up and hosting a full node was one evergreen on my bucket list.

What prevented me from “being my own bank”? Beside a huge workload on my day job, I think the main reason was an overestimation of the required hardware and bandwidth requirements. With currently over 300 GB and a growth rate of 100-200 MB per day the greedy hoarder inside me got active. “What if you exceed your bandwidth?”, “Won’t that affect your Netflix-binging?” and other stupid excuses came up.

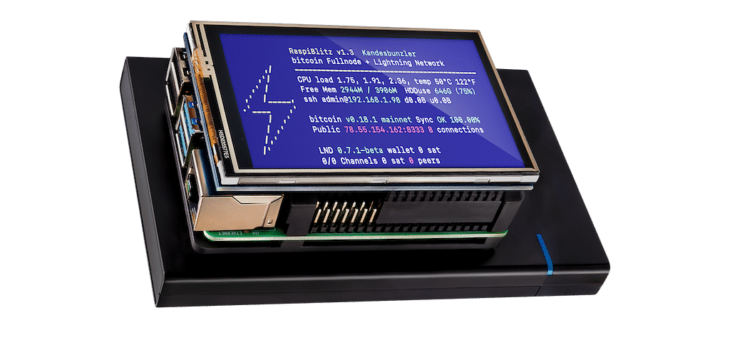
Finally, during the preparation for the Lightning Hacksprint, the Bitcoin idealist in me won against my inner sloth and thus I was happy that Fulmo helped me getting hands on one Raspiblitz, the Raspberry-Pi-based Lightning Node. As the nerd that I am, I had some prior experience with other Raspberry Pi and Arduino-based projects. So I wanted to assemble the Lightning Node by myself and decided for the Raspiblitz – Heatsink Case.

In this article I would like to describe my first steps towards being a full member of the brotherhood of Bitcoin. The aim is not to provide a guide. The reason is simple: Another guide is not really needed! Setting up the Raspiblitz, transferring funds to it and opening the first channels on the Lightning Network is not complicated at all. At every step it is clear what the software of the Raspiblitz wants you to do, the Github page of Raspiblitz is full of information and the community is eager to help. The aim of this article is rather to illustrate how easy it is to get a Lightning Node up and running.

Getting the Raspiblitz to run

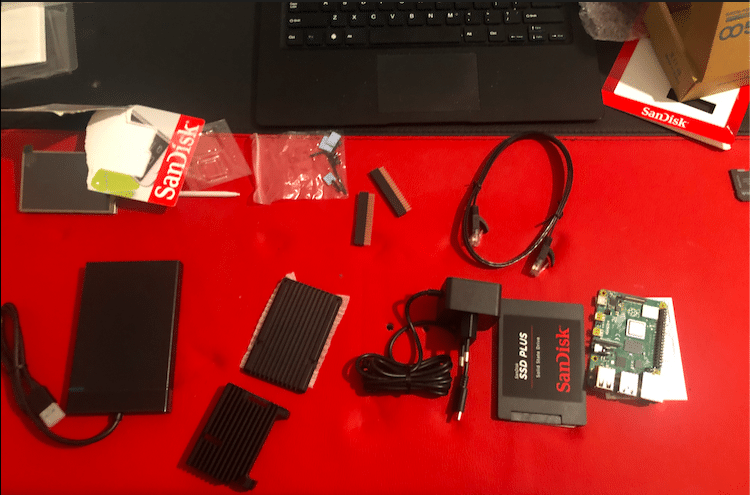
Having said that, a complete technical layman might at first feel a little bit overwhelmed by the collection of electronic items:

RaspiBlitz Parts

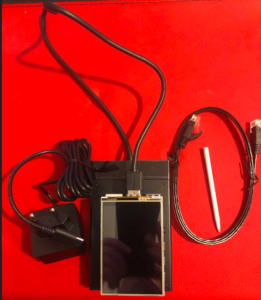
But don‘t be afraid: assembling the hardware is as complicated as building something out of Lego – or even more simple. The aforementioned Github Page of the Raspiblitz project is quite helpful, so it ony took a couple minutes until I ended up with an assembled Raspiblitz:

RaspiBlitz Assembled

Yes, there are still some steps to go to a fully functioning node! Up until now we only have assembled some parts. No software, no Blockchain and no funds. So – you guessed it – no fun! So let‘s describe the next steps towards a fully functioning node. As you will see: no need to be afraid of being a first class citizen.

The first step you have to do is installing the operating system for the Raspiblitz. The current version is 1.5 and can once again be found on the mentioned Github page. As you can see: a lot can be found there, so simply put the link into your bookmarks. The easiest way to get this operating system up and running is to write the socalled iso-file on a SD card. That can be done with programs such as Balena Etcher. After writing the iso-file on the SD-card, simply plug this card into the Raspiblitz, connect the latter to a power source – and it‘s alive!

The system boots up and an address is shown over which you can access your Raspiblitz. The address will have the form 192.178.168.228. To access your Raspiblitz from another computer being a friend of the terminal is advantageous. So, open bash or another shell of your choice and enter:

ssh admin@192.168.178.228

You will be prompted for a starting password (which you’ll have to change later on). After some additional steps, the Lightning node is up and running.

Okay, “running” is perhaps not completely correct: The Blockchain is not yet downloaded. Being a bit patient pays off: Synchronizing the whole Blockchain from scratch takes a while!

After some time (usually around 48 hours) you can pride yourself: You now belong to the people with a complete copy of the Blockchain. You are part of the foundation of Bitcoin. Welcome to the elite, pal!

The final step to Lightning: opening and funding channels

Yes, with a node set up, up to this point you won‘t be able to transfer any bitcoins – be it via the Lightning Network or on the base layer. Some funds will still have to be transferred to your full node. Doing that is the same as sending some bitcoin, so everybody who played aaround with a mobile wallet, with a Trezor or an Electrum wallet will know how to do that. Also opening Lightning channels is not that complicated; the menu describes quite well what you have to do.

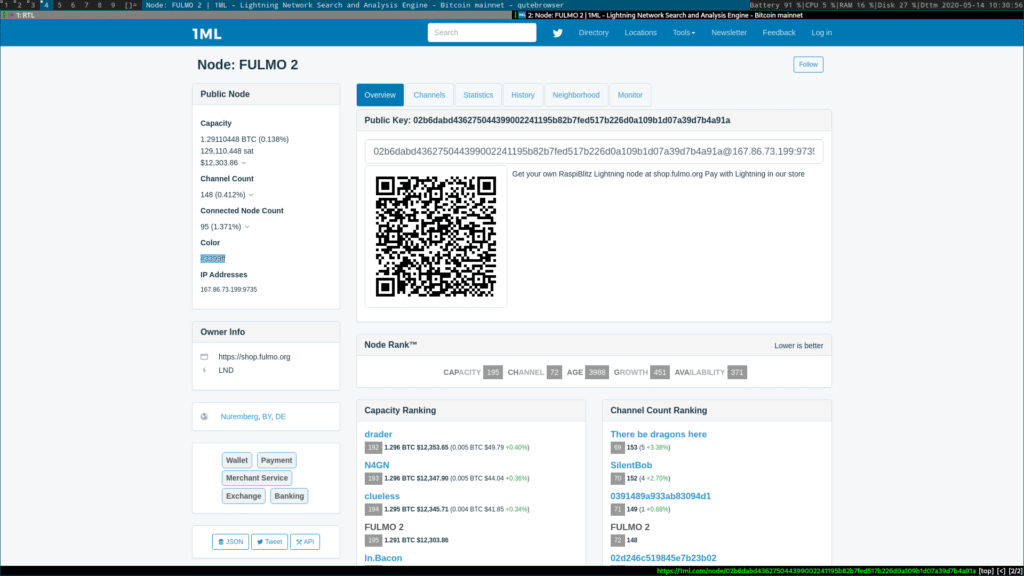
To open a channel to a peer, you have to connect to him. I set up my first Lightning channel to Fulmo‘s Lightning node, so I‘m all set for the next Lightning Hackday or the day when I can buy nifty Lightning basecaps or T-shirts at the Fulmo shop. All the information needed to connect to a possible peer can be found at 1ML:

Bitcoin Lightning Node

After the connection is established it‘s easy to fund a channel with this peer. Simply state the amount in satoshis. Then you will have to wait for three confirmations and the first channel is opened.

The next steps as a first class citizen

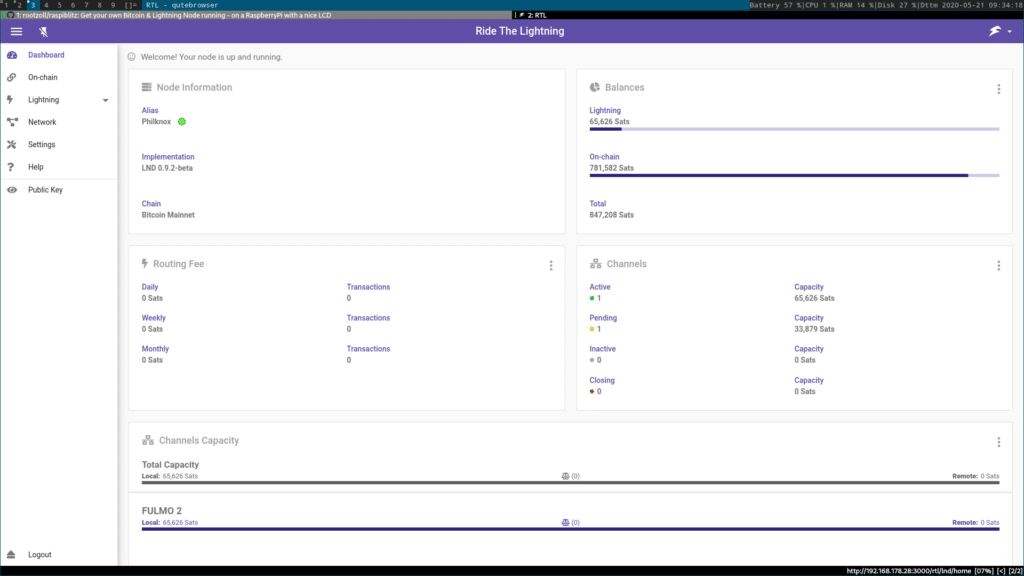
Your Lightning node adventure does not stop here. Sure, you can now send and receive money via the base layer and via Lightning network, but you can do so much more. You can connect several mobile wallets with ease, you can use Joinmarket as a Coinjoin service … there are a lot of possible next steps. For people not loving the terminal as much as I do, there is also a web user interface called „Ride the Lightning“ available:

RaspiBlitz RTL

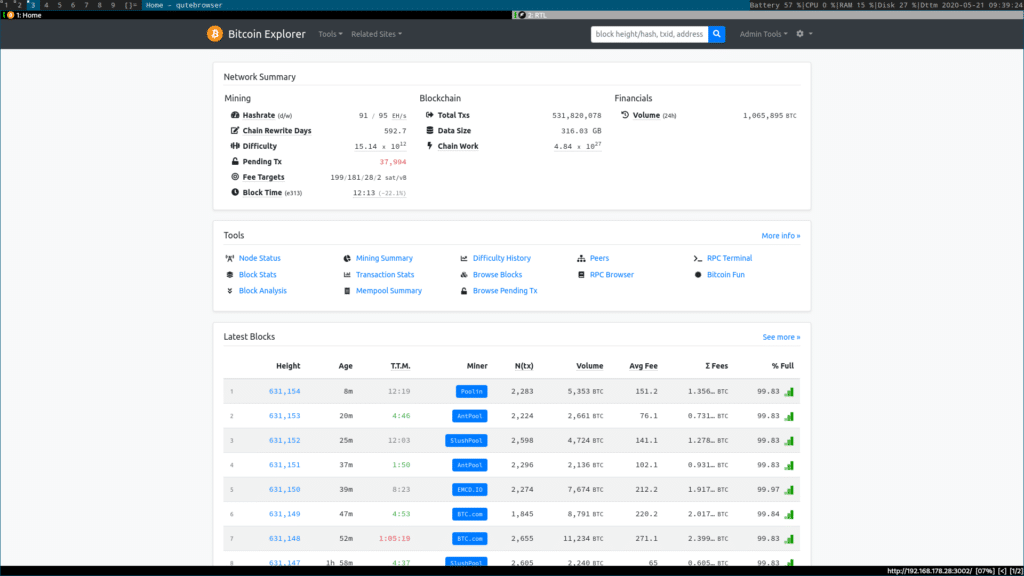
Speaking of web user interfaces: You don’t need to trust external Blockchain explorers anymore! With the Bitcoin Blockchain at your home, you have everything you need to set up your own Blockchain explorer:

Similar to the lessons regarding the Lightning Hacksprint, I can highly encourage everyone to set up a Raspiblitz. It‘s very easy and straight-forward, the bandwidth at your home won’t break down and you will do an essential job for the decentralization of Bitcoin. “Don’t trust, verify” won‘t be a simple saying anymore, you will live it now. So, get your hands on a Raspiblitz, set up this Lightning node and become a first class citizen of Bitcoin! I’ll be waiting on the other side.

How to survive your first Hackathon

  • May 15, 2020May 16, 2020
  • by Philipp Giese

My lessons learned at the Lightning Hacksprint

So you want to get your hands dirty and interact with the developer-community around Bitcoin. Great! You seem to understand that “be your own bank” means more than “number go up”. BYOB implies that everyone is proactively involved getting Bitcoin and Lightning running. We are building up the new kind of money. And to do that, in a trust-minimized way, needs everybody.

But where to start? Hackathons can be a good opportunity to take the tech-pill. Or, even more convenient from the comfort of your own home: Dive deep into the coding community of Bitcoin by participating at the Lightning Hacksprint. A wrap-up of this Event is available on Youtube.

The last event, which took place between May 9th and May 10th, was a blast. I can highly recommend everyone interested in Bitcoin and the Lightning Network to be there when the next Hacksprint, organized by Fulmo, takes place. It does not matter if you are a professional developer.

That being said some technical experience can help and prevent you from some humbling experience. Because, to be honest: my biggest lesson learned was that I am not as smart as I thought I would be. Armed with some data science experience (mainly in R, some experience in Python) I knew that it would not be a cakewalk for me but never thought that I was stuck quite early at the beginning. At a first glance the sad news was that I could not participate in the way I planned to do.

The Lightning Hacksprint was Nevertheless a great experience. I could follow development work around, experiment with the code on my machine and in that sense really live the “Don’t trust, verify” in its fullest extend.

Moreover, I learned quite a lot for future Hacksprints. So lets dive right in and look at my personal lessons learned!

Create a distraction-free environment

On the weekend of the Lightning Hacksprint, I was not alone at home. While I could hide myself in my bedroom (which I did for most of Saturday) it was obviously not ideal. Moreover, I had to do some phone calls, and had an appointment on Sunday evening.

At regular Hackathons you are taken from your normal surroundings which can help a great deal, but thanks to Corona we have to find a way to get rid of the distractions at home. So for the next Hacksprint I plan to really seal myself off from the rest of the world.

Get your communication tools ready

The second lesson should be well-known in times of corona: Get all communication tools running! The communication during the Lightning Hacksprint was primarily done over two platforms: Mattermost was, as an open-source-alternative to Slack or Microsoft Teams, the messaging platform of choice, while Jitsi was used for video conferencing. Different projects used additional software to keep in touch but all in all one big lesson was: Check whether the tools at hand work well.

How is the internet connection? Is Jitsi working? And how about your microphone? I personally had to use both my Laptops, one for hacking, one for listening to Jitsi. Moreover, I had to check several Headsets until I found one which worked well. While that was in that case not impeding the work of others obviously work could have been much more fluent with a little bit of preparation.

Install the mandatory programs

My biggest mistake was that my software environment was not completely prepared. While it cannot be stressed enough that everybody should run a Full node (and setting up one is, thanks to the Raspiblitz, pretty easy), some development projects don’t need a running full node. However, the Bitcoin client bitcoind as well as a Lightning client (lightningd when working on a project around c-lightning) should be installed.

Oh, and I should stress installed correctly. My initial approach regarding bitcoind was to download a precompiled version “to save some time”. That ended up in some weird aliasing and extending of $PATH but a decent interaction between lightningd and bitcoind could not be achieved. The solution that worked for me was then to install bitcoind from source.

Even before that, dependent on your respective system and at the task in hand, you will need some programs. Some programs which you definitely won’t regret having installed are:)

  • C and C++
  • git
  • Python (>version 3.0)
  • Pip
  • Some editor or IDE. Most operating systems are shipped with several editor options.

That list, obviously, can be extended dependent on the challenge you plan to work on. If the project involves Rust, it is obviously recommended to install it. If you work with Python, installing the Lightningd-Library pyln would be a good idea.

So one important lesson learned was: get the needed tools together. Already before the Hackathon, get to know these tools. If not you risk losing falling behind the other people working on a project – or, even worse, you slow everyone down.

To install these programs, even when done from source, you don’t need to be an expert programmer. Most of the programs have decent installation scripts which can be invoked with several commands. What is needed, though, is a little bit of tinkering on the command line. With that we come to the next point.

Become a Terminal-maximalist

If you are a Linux-user (or if you know that Mac-OS is, in fact a BSD derivative) you will already know it: the Terminal is your friend! When developing, the Terminal is not only convenient but one of the most important tools you’ll use. The installation of the tools mentioned above will take place on the command line. A lot of editors such as Nano or vi(m) are per default run from the command line, others such as Emacs have the option to do that.

Note also that I said Terminal- and not PowerShell-maximalist. While Windows 10 had made giant steps forward with their Windows Subsystem for Linux, the integration within the Linux file structure for the tools mentioned above is best in a *nix-like system. The community is also larger so that, if you are stuck, more people could help you. Finally, its also a great way to prepare yourself for a Raspiblitz. Yes, when the Lightning Node of Fulmo is up and running a lot of things can be done in the different menus. However, for debugging the Raspiblitz knowledge about the Terminal can be a huge help.

Grab your coffee and hack!

The fifth and most important lesson: do it! Bitcoin-developers are no reclusive, elitist cabal. They are very welcoming to newcomers and quite happy when people want to participate in a Hackaton. Of course, as always the Golden Rule “don’t be a nuisance” applies. Like in other communities a little bit research prior to asking the community can help. During a Hackathon or Hacksprint everybody is quite busy so asking really basic questions can be a distraction. So flex your Google Duckduckgo-Skills and try to find answers before asking every question.

That being said: Irrelevant of your experience I can invite everyone to observe the more technical side of Bitcoin. Even if you think you cannot work on one of the proposed challenges just watch these evolving from the sidelines. You can also work on your Raspiblitz, for example update it to a new version or getting in touch with some new features. So if you have one at home and wanted to ask the developers anything: These Lightning Hacksprints are a great opportunity.

See you guys at the next Hacksprint!

Recent Posts

  • Bitcoin LightningATM – Pocket Edition construction guide
  • Regulatory attention on Bitcoin & privacy techniques to counter
  • WHY BITCOIN CAN ONLY BE AS FREE OPEN SOURCE SOFTWARE
  • The LightningATM – Pocket Edition
  • RaspiBlitz Unboxing

Recent Comments

    Archives

    • August 2022
    • May 2021
    • March 2021
    • September 2020
    • May 2020

    Categories

    • Bitcoin
    • Bitcoin Lightning Nodes
    • Lightning Network

    Impressum

    FULMO

    FULMO Shop

    RaspiBlitz.com

    TheLightningConference

    @rootzoll

    @RaspiBlitz

    @LightRider

    @FulmoLightning


    Fulmo Logo

    We’re an open source company dedicated to research, development and consultancy for the Bitcoin Lightning Network.