 Bitcoin
Bitcoin LightningATM – Pocket Edition construction guide
The LightningATM is a fully functional Bitcoin ATM and demonstrates the power of the Bitcoin Lightning Network. It accepts Fiat-Coins and gives you back precious Satoshis (SATS). Thanks to Lightning even small amounts can be exchanged with near-zerofees. The LightningATM is the perfect Showcase on every Meetup, Conference, or in your Office to onboard more people in a fun way to Bitcoin.
In this guide, we put together our knowledge and give you a guide to assemble the LightningATM construction set which you maybe bought in our shop. But even if you purchasedall the parts by yourself the guide should be helpful. Besides our documentation,you find excellent tutorials and videos on the official Bitcoin LightningATM wiki and in our first guide. If you prefer to have a tutorial in german I can highly recommend the great tutorial at Ereignishorizont.
This guide is divided into five sections:
- overview LightningATM hardware components
- hardware assembly guide
- Software setup LightningATM
- Software setup lntxbot
- your first exchange
Important: All the hardware assembly and software setup/usage you are doing at your own risk!
LightningATM hardware components
Before you can put together the different hardware components you should haveat least the following tools for the proper construction of the ATM at hand:
- small screwdriver
- voltmeter
- one insulated plier (alternative: sharp knife)
- soldering iron (optional)
If you don’t have a voltmeter at hand maybe ask in a hacking space near you before you purchase one, they should have one. You need the voltmeter just to tune thevoltage transformer once.
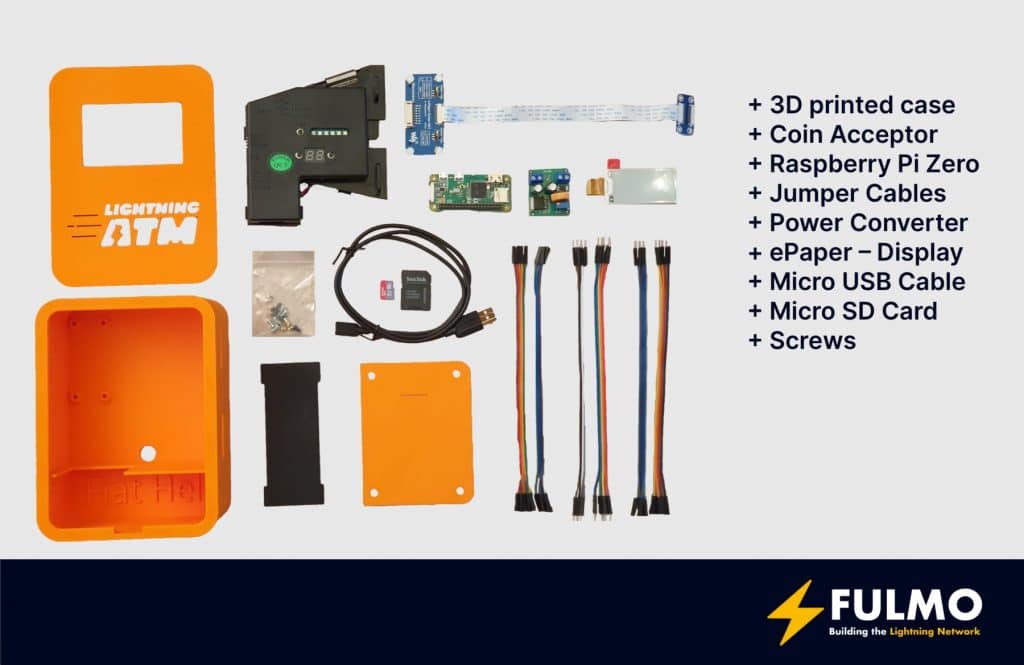
All the parts you need for the ATM are the following:
- 3D printed case
- Coin Acceptor
- Raspberry Pi Zero
- Jumper Cables
- Power Converter
- ePaper – Display
- Micro USB Cable
- Micro SD Card
- Screws
We recommend using the Version 2 of the Waveshare 2.13inch display. Otherwise, you can face problems in running the demos from Waveshare library and the ATM software itself. Please check the back of the display for a “V2” sticker.
When you have all parts together let’s get our hands dirty and let’s assemble the components.
Hardware assembly
Micro USB Cable
Let’s start with the preparation of the Micro USB Cable. With some luck, you got already the Micro USB / USB Type-A version with open wires. Lucky peep, no work for you. If you got one complete Micro USB / USB Type-A cable you have to cut it in half. The cable with the Micro USB head should be around 12 cm.
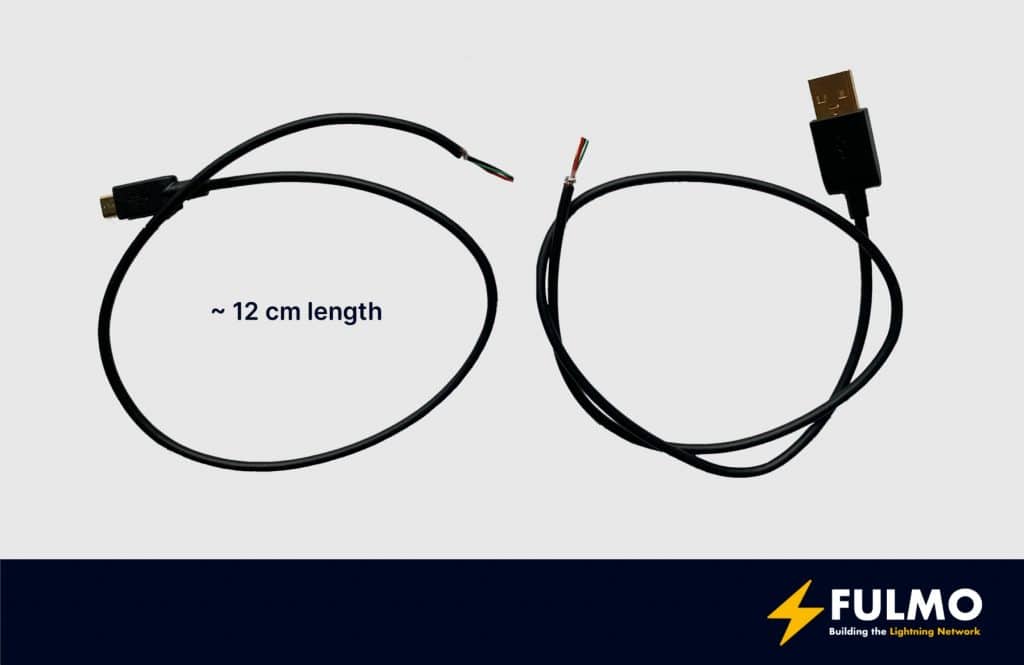
You have to uncover the electrical conductors and can also remove the data conductors (green and white) from the cable if you want. For the best possible result and to have it easier for the connection with the power converter, you should solder the conductors. But no worries if you haven’t a soldering iron you can just twist the conductors and bring them in shape.
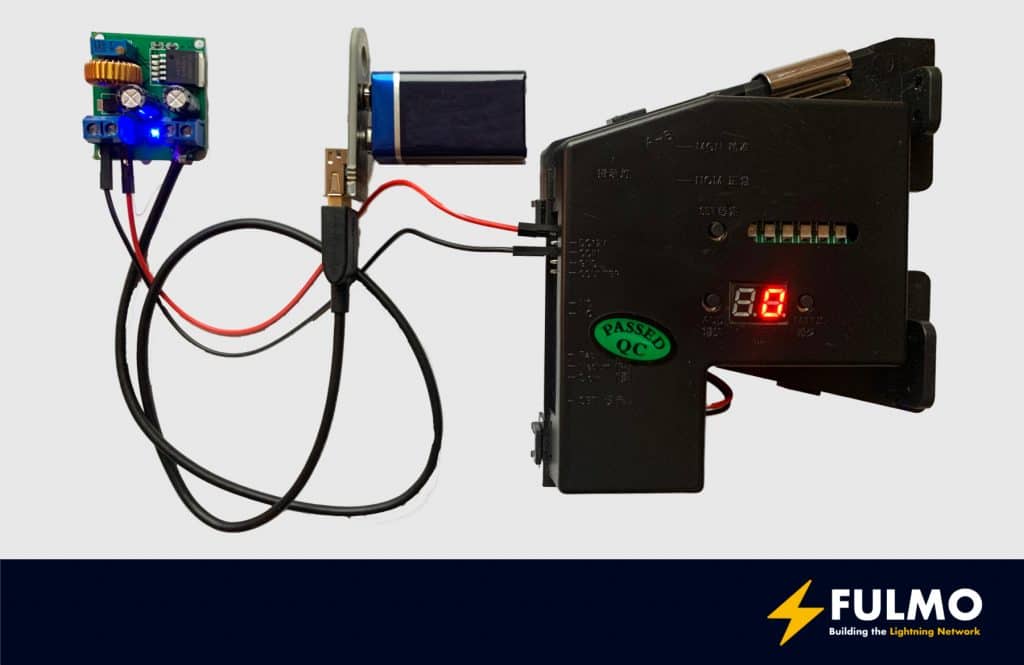
Prepare the power converter
If you have your UBS-Cable prepared you can now connect it to the IN ports of the power converter. The black cable has to be connectedto IN(-) and the red cable to IN(+). If the cable is connected to the converter you have to adjust the resistor to get the proper poweron the outgoing connections of the converter.
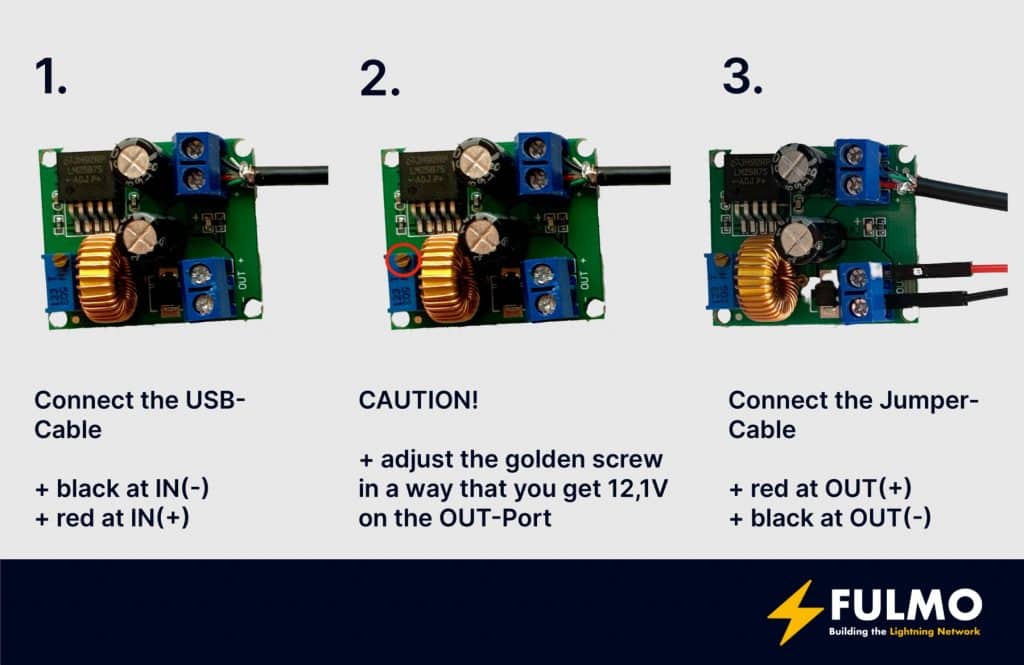
CAUTION! IN THE NEXT STEP!
The converter could have high voltage on the OUT ports.
Connect the USB-Cable head to a power bank or 5V battery and put the voltmeter at the OUT(-) and OUT(+). Now adjust the little golden screw as long as you have 12,1V on the voltmeter. You must have exactly 12,1V. If the voltage is too high, you could destroy the coin acceptor. Remove the voltmeter from the OUT port and add two jumper cables to it.
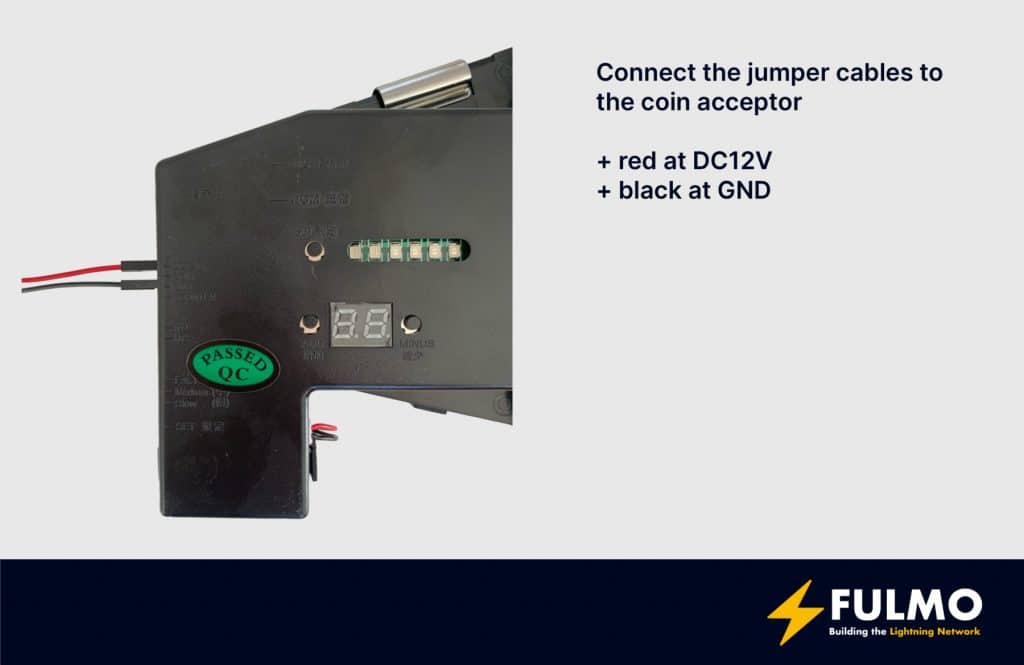
Prepare the coin acceptor
Now you can connect the jumper cables with the coin acceptor. The red jumper cable goes to DC12V and the black jumper cable goes to GND.
Configure and teach the coin acceptor
When you finished the previous steps your setup should now look something like this, except for the power supply:
Now it’s time to configure the coin acceptor.
If you prefer a more visual guide for the configuration and for the teaching of the coin acceptor you should check out the following video from 21isenough: https://youtu.be/14JfEhNSdZE?t=1413
Following the steps for the configuration.
- Set the two step switch on the coin acceptor to “NO”
- Set the three step switch to “Medium”
- Press and hold the ADD and MINUS button at the same time until A appears in the display
- Press the SET key and hold it for a short time, then E appears in the display. This indicates that you are now in the menu for the number of different coin types
- Use ADD (or MINUS) to set the number of coins to 6 (coins = 5 cents to 2 euros) and press SET
- Now the display shows H1 (for first coin) and the first of 6 LEDs should be active
- Now indicate how often the coin should be inserted for calibration. Set to 20 with ADD (or MINUS) and press SET
- The display now shows P1 for further settings of coin 1 and you can define the output signal 5 cents = 2 pulses / 10 cents = 3 pulses / 20 cents = 4 pulses / 50 cents = 5 pulses / 10 euros = 6 pulses / 2 euros = 7 pulses
- Set with ADD (or MINUS) to 2 pulses (for 5 cents) and then press SET
- The last thing on the display is F1, which stands for the accuracy of the coin detection. The value 8 worked well
- Use ADD (or MINUS) to set to 8 and then press SET
- The parameterization for the first coin is now done and the next 5 coins must follow
- Now the second LED is on and the display shows H2
- Repeat the same steps for the second coin up to 6 coins
- If all coins are set, all LEDs flash briefly to confirm and the display shows A again
- After a short time the display shows 0 (zero) again
If the steps were successful you can calibrate now the coin acceptor.
- Press the SET key twice
- The first LED light and A1 appears in the display
- Now insert the first coin (5 cents) 20 times.
- It is recommended to use as many different coins of the same type as possible
- After all that the LEDs will flash and the display will show A2
- Repeat the procedure for the remaining coins
- All LEDs flash again briefly for confirmation and the display shows 0 again
Now the coin acceptor is ready.
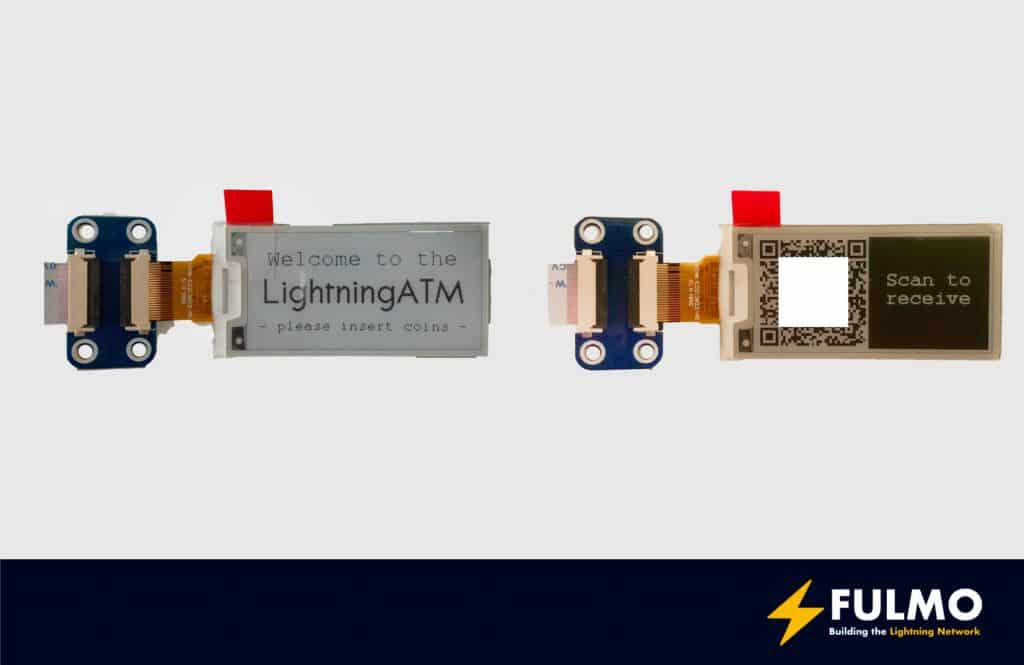
Prepare the display
The next step is the preparation of the display. If you have any issues with the display or later problems with the software for the display you should check out the official Waveshare Issue-Tracker and the official documentation.
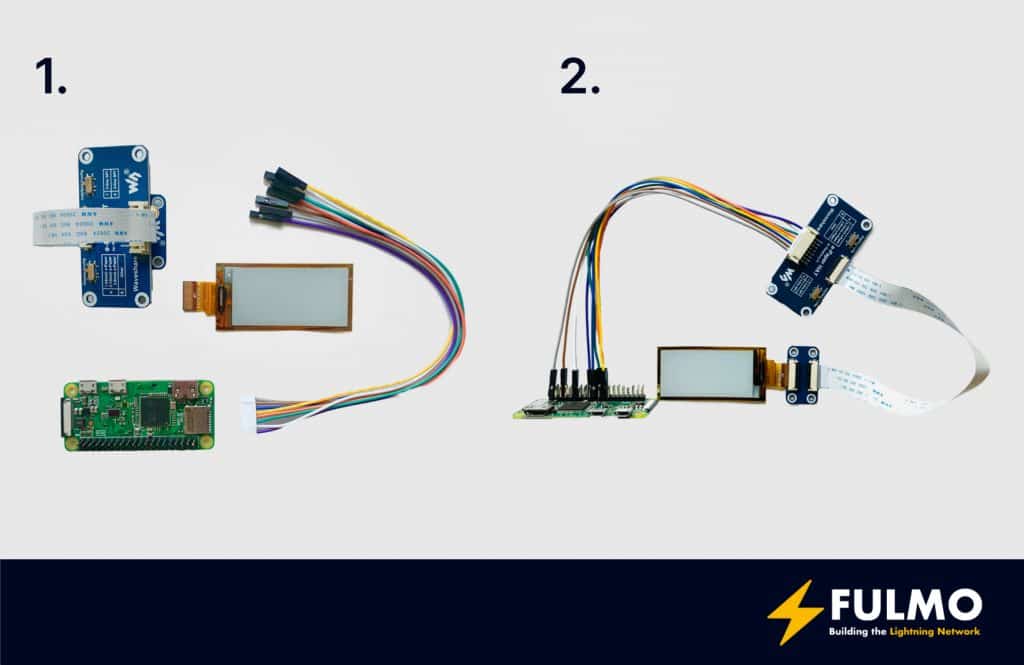
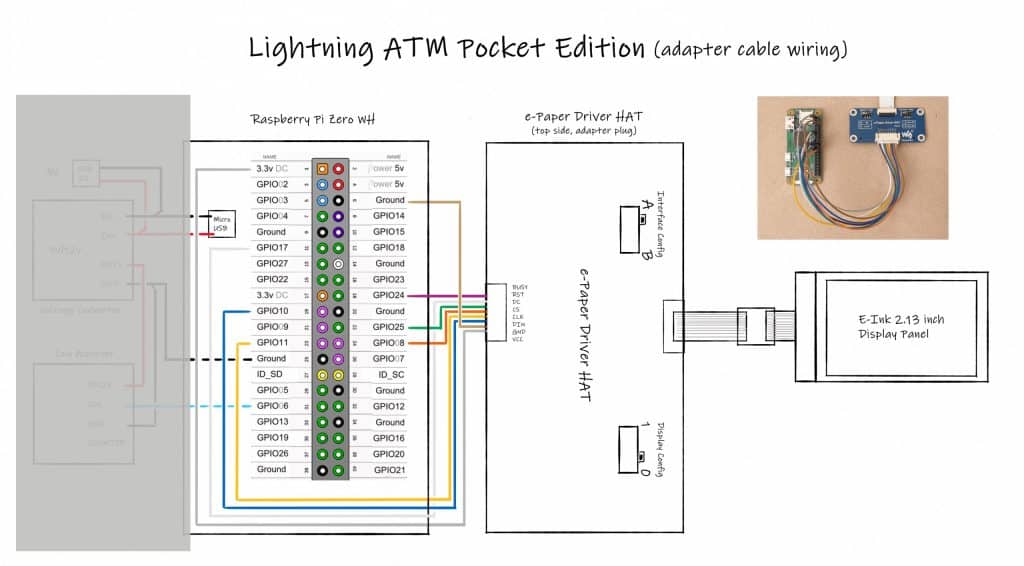
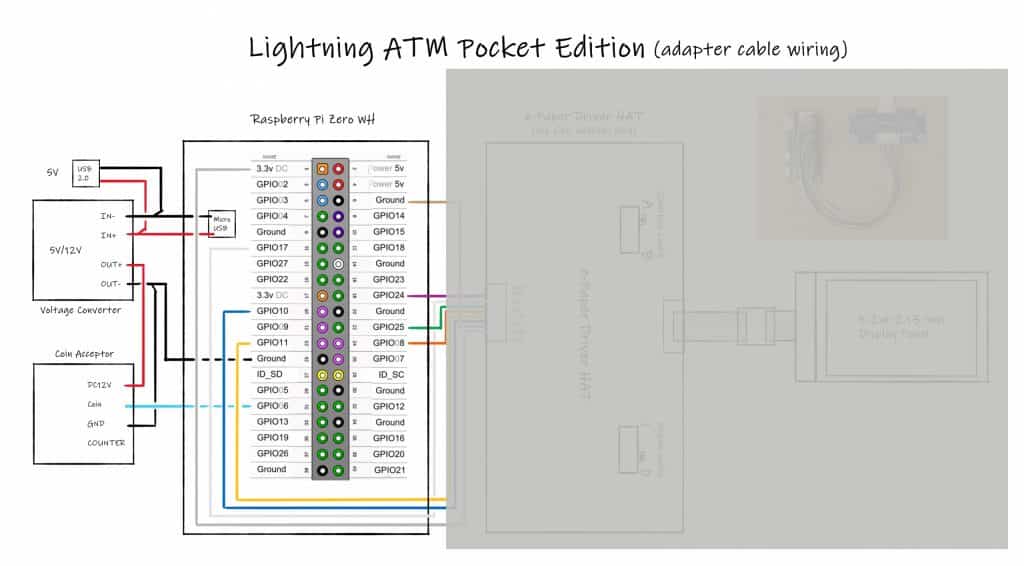
First, you mount the e-Paper display to the e-Paper-Adapter. Be careful, the e-Paper display is very fragile. The next step is to connect the e-Paper-Adapter to the e-Paper-HAT with the flat white cable. The third step is to connect the 8 cables from the e-Paper-HAT to the Raspberry Pi Zero. For the wiring, details have a look at the great plan from Axel Hamburch:
Connect the Raspberry Pi Zero with the Coin Accepetor
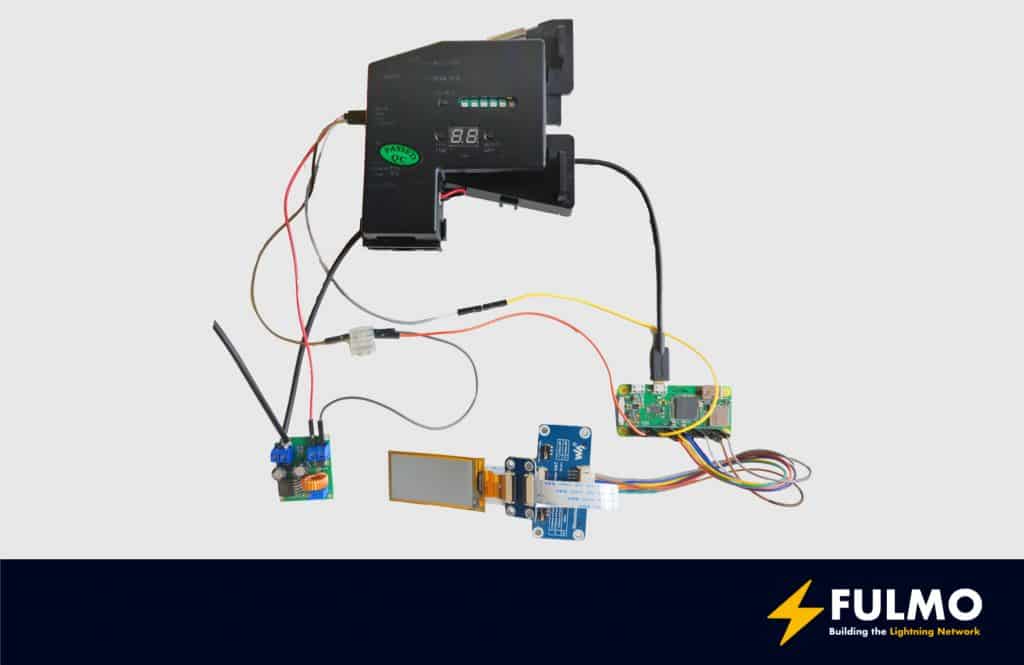
For further details look at the detailed wiring plan:
At that point your hardware is ready and you can go to the software setup. Before you put everything into the case I recommend first to setup the software. It’s easier to do debugging outside of the case.
Setup the LightningATM
Install the ATM software
You can find further explanations at the official ATM documentation.
- Download the Raspbian ATM Image
- Flash the Image to the SD Card with balenaEtcher
- Remove and add the SD Card again to your computer
- In the mounted SD Card add one file to the /boot folder on the flashed SD Card
- Create “wpa_supplicant.conf” file and add your Wifi credentials
The configuration file should look like:
ctrl_interface=DIR=/var/run/wpa_supplicant GROUP=netdev
update_config=1

network={
	ssid="Home"
	scan_ssid=1
	psk="XXXXXXXXXXXX"
	id_str="Home"
}
Remove the SD Card from your computer and put the card in the Pi Zero.Turn on the Raspberry Pi now and wait a bit. In the meantime check atyour local router which IP address was assigned to the Zero. To makethings easy in the future let the router always assign the same IPaddress to the Pi.
Go to a terminal application on your computer and remotely access yourPi. For example the “Terminal” on macOS or Windows via the SSH-Client”PuTTY”.
- Login to your Zero with the IP and the user “pi” for example “pi@192.168.xxx.xxx”
- Confirm to add the ECDSA key fingerprint with “yes”
- Login with the default password “raspberry”
- Change the default password of the user “pi” to a new password with “passwd”. CAUTION: you have to remember the password for the future. Best, put it directly into a Password-Manager
- Upgrade the Pi Zero to the newest software version
$ sudo apt update && sudo apt upgradeIt takes some time but doesn’t skip the step because you will also get security patches with an update.
Now you can install “clone” the current version of the LightningATM Software:
$ git clone https://github.com/21isenough/LightningATM.git
$ cd LightningATM
$ pip3 install -r requirements.txt
In the process, the Pi will reboot and you have to log in again with the credentials you set earlier.
Install the display drivers
First you have to install the Waveshare Python display driver.
Execute the following commands:
$ cd ~
$ git clone https://github.com/waveshare/e-Paper
$ cd ~/e-Paper/RaspberryPi*/python
$ sudo python3 setup.py install
If you want to test for the correct installation and correct wiring of your display you can use the example programs included in the cloned project.
CAUTION: Before running the display test make sure that your e-Paper-HAT switches (little jumpers) are set to A and 0.
$ cd ~
$ cd e-Paper/RaspberryPi_JetsonNano/python/examples/
$ sudo python3 ./epd_2in13_V2_test.pyCAUTION: If you have a different display version (little sticker on the e-Paper display back) than “V2”, you have to adjust the test program accordingly.
If you have problems getting the demo running you find more help in the Waveshare Issue tracker.
If everything works fine you can initialize the ATM software. With the first startup of the ATM, the “config.ini” will be created.
Execute the following commands:
$ cd ~/LightningATM/
$ ./app.py
This will lead to an error like “No display configuration matched”. That’s why we have to adjust the “config.ini” now.
$ cd ~
$ nano ~/.lightningATM/config.ini
When the file is open, change the “display” variable to “waveshare2in13v2”.
# Define what screen you are using with the ATM
# Current options are:
# display = papiruszero2in
# display = waveshare2in13
display = waveshare2in13v2
You can save your changes now and close the file for now.
Setup lntxbot
To get Bitcoin for the dirty fiat coins to have to define an exchange endpoint. To keep things easier we concentrated on the Telegram-Bot called lntxbot. You could do the same with a BTCPay Server endpoint.
Open the “config.ini” file and do the following adjustments.
Set the wallet to the lntxbot.
activewallet = lntxbotNow you can add your credentials for the bot:
[lntxbot]
url = https://lntxbot.com
creds = YOUR_LNTXBOT_CREDENTIALS
In your lntxbot you can get your credentials with the following command:
/lightningatmThe output should be similar to:

You can save the file now.
First exchange
If the previous steps all succeeded you can test your first exchange with the ATM.
$ cd ~/LightningATM/
$ ./app.py
You should see now the welcome message from the ATM and can insert the first coins.After some time the display should print that beautiful invoice which you canscan in your wallet.
Congratulations! You made your first transaction with the Pocket ATM. Now spread the word and showcase the ATM on the next community meetup.
May the Bitcoin be with you!